Spring高级
课程链接:点击跳转
01-BeanFactory与ApplicationContext
依赖:
    <dependencies>
        <!--  web启动器    -->
        <dependency>
            <groupId>org.springframework.boot</groupId>
            <artifactId>spring-boot-starter-web</artifactId>
        </dependency>

        <!--   starter     -->
        <dependency>
            <groupId>org.springframework.boot</groupId>
            <artifactId>spring-boot-starter</artifactId>
        </dependency>
    </dependencies>
创建Spring容器
/**
 * BeanFactory 与 ApplicationContext的区别
 *
 * @author 赖卓成
 * @date 2023/05/29
 */
@SpringBootApplication
public class A01Application {

    public static void main(String[] args) {

        // 返回的是Spring的容器
        ConfigurableApplicationContext applicationContext = SpringApplication.run(A01Application.class, args);
    }

}
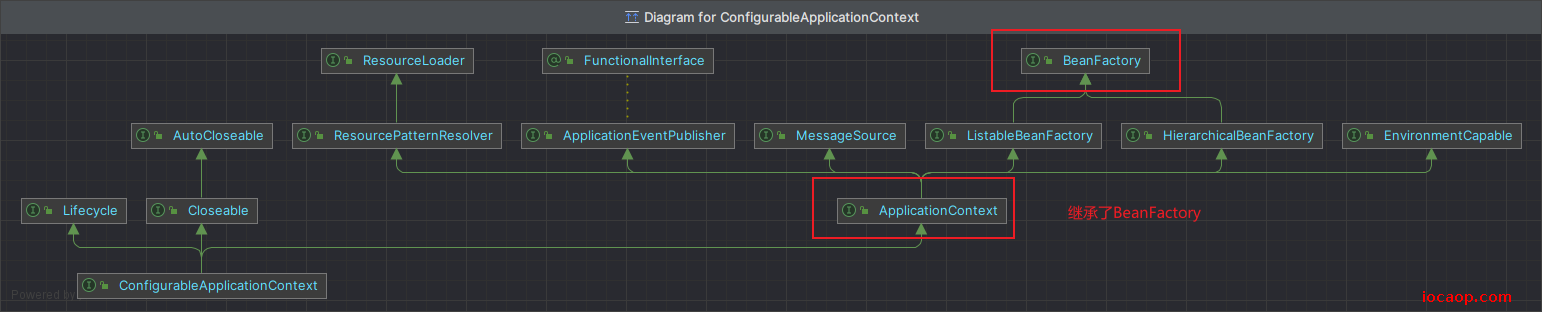
ConfigurableApplicationContex是ApplicationContext的子接口。
ctrl+alt+u可以查看类图
可以看到ApplicationContext间接继承了BeanFactory接口,同时也继承了其他的一些接口(为了扩展功能)。
到底什么是BeanFactory:
- 它是
ApplicationContext的父接口 - 它才是
Spring的核心容器,主要的ApplicationContext实现都组合了它的功能。
组合二字如何理解?
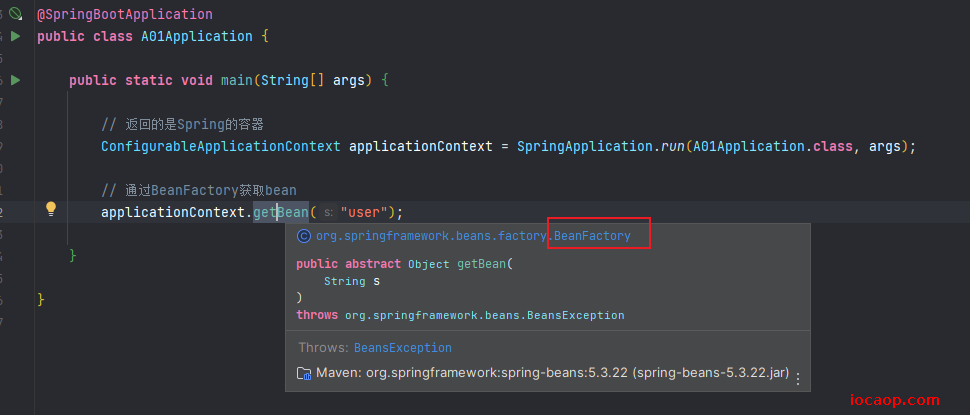

在使用ConfigurableApplicationContext获取Bean时,是调用了BeanFactory中的方法,而不是由ConfigurableApplicationContext来实现的,所以说是在内部组合了一个BeanFactory且组合了他的功能,简单的说BeanFactory 是ApplicationContext的成员变量。通过打断点调试或翻看源码可以证明:
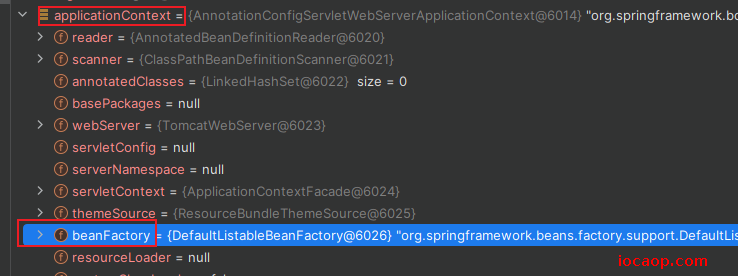
在BeanFactory中可以看到 singletonObjects,里面存放的是单例bean。
快捷键:ctrl+alt+b查看实现类,ctrl+b查看接口
02-BeanFactory的功能
接口中的所有方法:
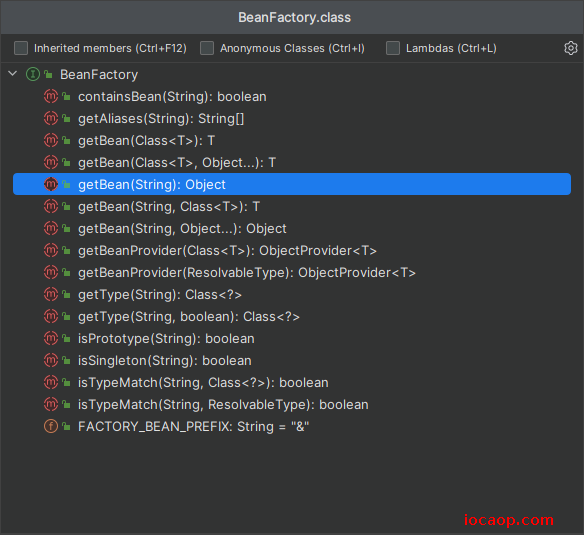
表面上是只有getBean,实际控制反转、基本的依赖注入、Bean的生命周期的各种功能,都在它的实现类进行了实现。
具体是在DefaultListableBeanFactory对这些功能进行了实现:

快捷键:在类图中按f4可以跳转到对应类的源码。
其中DefaultSingletonBeanRegistry管理了单例bean,在该类,有个Map集合,放了所有的单例bean,key是实例的名称,value就是实例:

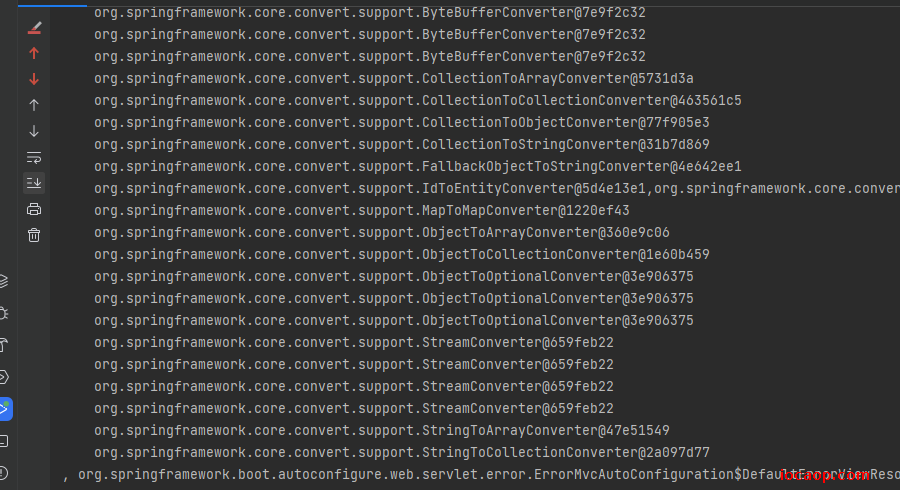
这个map是私有的,有两种方式可以看,debug和反射。debug不方便,所以使用反射来拿到这个map,看看里面有些什么,打印了一大堆的bean出来。
@SpringBootApplication
public class A01Application {

    public static void main(String[] args) throws NoSuchFieldException, IllegalAccessException {

        // 返回的是Spring的容器
        ConfigurableApplicationContext applicationContext = SpringApplication.run(A01Application.class, args);

        // 通过BeanFactory获取bean
        System.out.println(applicationContext);
        Field field = DefaultSingletonBeanRegistry.class.getDeclaredField("singletonObjects");
        field.setAccessible(true);
        Map<String,Object> map = (Map<String, Object>) field.get(applicationContext.getBeanFactory());
        System.out.println("map = " + map);
    }

}
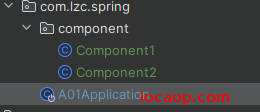
自定义两个组件,看看能不能拿到:
@SpringBootApplication
public class A01Application {

    public static void main(String[] args) throws NoSuchFieldException, IllegalAccessException {

        // 返回的是Spring的容器
        ConfigurableApplicationContext applicationContext = SpringApplication.run(A01Application.class, args);

        // 通过BeanFactory获取bean
        System.out.println(applicationContext);
        Field field = DefaultSingletonBeanRegistry.class.getDeclaredField("singletonObjects");
        field.setAccessible(true);
        Map<String,Object> map = (Map<String, Object>) field.get(applicationContext.getBeanFactory());
        map.entrySet().stream().filter(entry -> entry.getKey().startsWith("component")).forEach(System.out::println);
    }

}
可以拿到:

03-ApplicationContext功能1
国际化
之前讲过,ApplicationContext接口继承了BeanFactory接口,扩展了功能,扩展的功能主要是因为继承了下面四个接口:
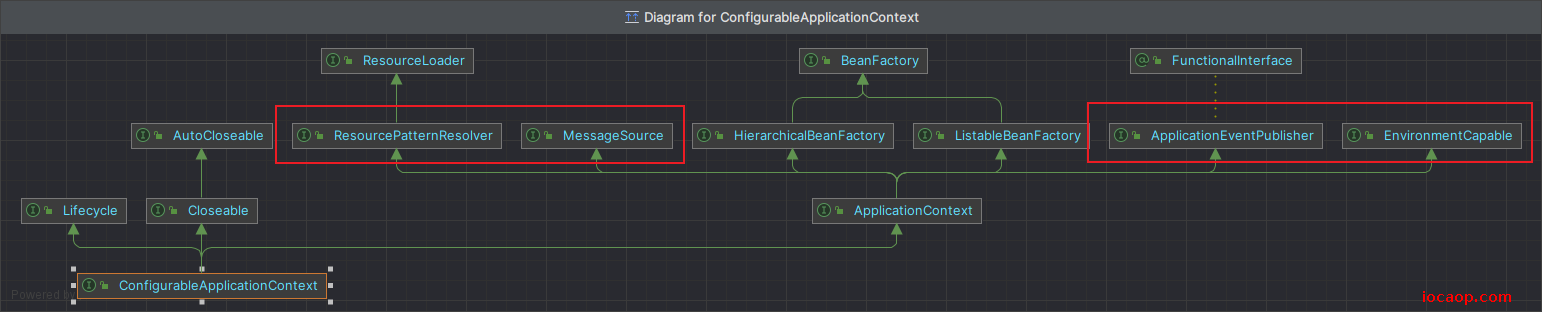
MessageSource:提供了处理国际化资源的能力。ResourcePatternResolver:提供了通过通配符匹配资源的能力,(从磁盘路径,类路径找文件)。ApplicationEventPublisher:提供了发布事件对象的能力。EnvironmentCapable:提供spring中的环境信息,如读取系统环境变量、读取properties文件、读取yml文件。
先来学习功能1,国际化MessageSource:
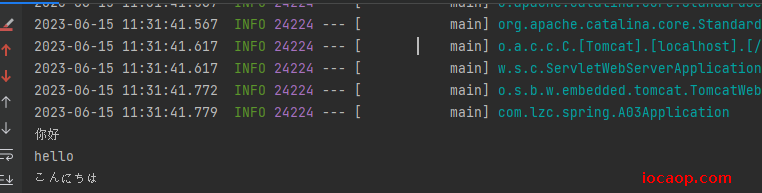
MessageSource会根据我们预先配置好的messages.properties帮我们翻译:
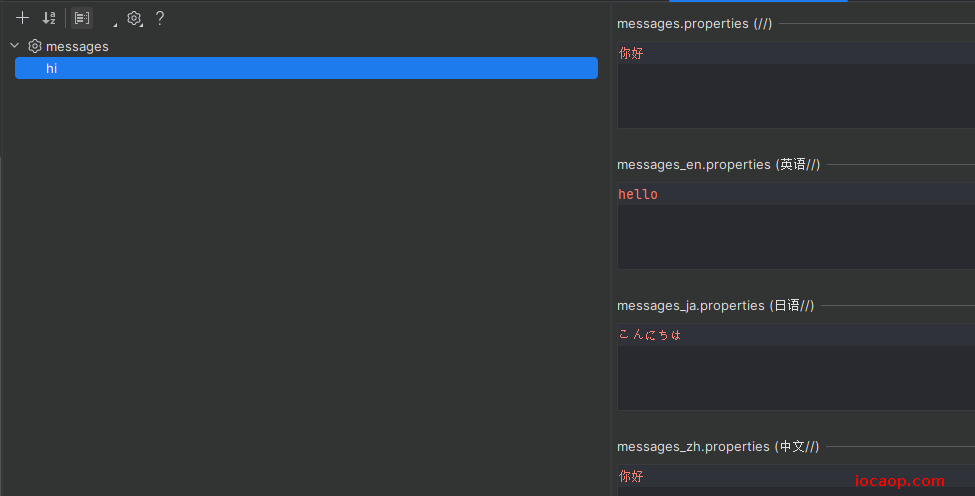
配置:点击跳转
通过applicationContext获取,因为ApplicationContext接口继承了MessageSource接口,调用的是父接口的getMessage():
@SpringBootApplication
public class A03Application {

    public static void main(String[] args) {
        ConfigurableApplicationContext applicationContext = SpringApplication.run(A03Application.class, args);
        String zhHi = applicationContext.getMessage("hi", null, Locale.CHINA);
        System.out.println(zhHi);
        String enHi = applicationContext.getMessage("hi", null, Locale.ENGLISH);
        System.out.println(enHi);
        String jaHi = applicationContext.getMessage("hi", null, Locale.JAPANESE);
        System.out.println(jaHi);
    }
}
04-ApplicationContext的功能2和3
ResourcePatternResolver:通过通配符匹配资源
@SpringBootApplication
public class A04Application {
    public static void main(String[] args) throws IOException {
        ConfigurableApplicationContext applicationContext = SpringApplication.run(A04Application.class, args);
        Resource[] resources = applicationContext.getResources("classpath:application.yml");
        for (Resource resource : resources) {
            System.out.println(resource);
        }
    }
}
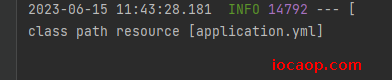
Resource是spring中对于资源的抽象。
来试试能不能找到springboot自动配置时所用到的spring.factories:
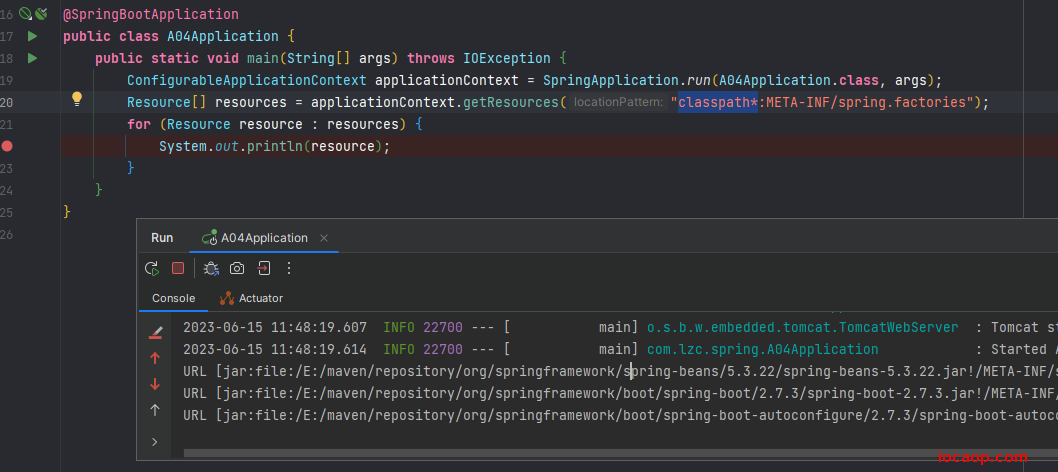
classpath:表示只在当前类路径下搜索资源,不包括其它的 jar 包或类路径。classpath*:表示在当前类路径以及所有的子类路径中搜索资源,包括其它的 jar 包或类路径。
EnvironmentCapable:读取环境信息
获取系统变量JAVA_HOME,不区分大小写。
@SpringBootApplication
public class A05Application {
    public static void main(String[] args) {
        ConfigurableApplicationContext applicationContext = SpringApplication.run(A05Application.class, args);
        String javaHome = applicationContext.getEnvironment().getProperty("java_home");
        System.out.println("javaHome = " + javaHome);
    }
}

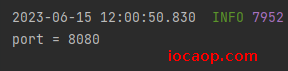
也可以拿到配置文件中的键值:
@SpringBootApplication
public class A05Application {
    public static void main(String[] args) {
        ConfigurableApplicationContext applicationContext = SpringApplication.run(A05Application.class, args);
        String port = applicationContext.getEnvironment().getProperty("server.port");
        System.out.println("port = " + port);
    }
}
05-ApplicationContext的功能4
事件发布
ApplicationEventPublisher:发布事件,解耦合。
首先我们定义一个用户注册事件,自定义事件需要继承ApplicationEvent:
/**
 * 用户注册事件
 *
 * @author 赖卓成
 * @date 2023/06/15
 */
public class UserRegisterEvent extends ApplicationEvent {

    public UserRegisterEvent(Object source) {
        super(source);
    }
}
发布事件:使用ApplicationContext继承自ApplicationEventPublisher中的方法进行发送:
@SpringBootApplication
public class A06Application {

    public static void main(String[] args) {
        ConfigurableApplicationContext applicationContext = SpringApplication.run(A06Application.class, args);
        applicationContext.publishEvent(new UserRegisterEvent("欢迎你,lzc,你已注册成功!"));
    }
}
发送后有什么用?有监听器进行监听,定义两种监听器,分别发送短信和邮件:
@Component
public class Component1 {

    @EventListener
    public void mail(UserRegisterEvent event) {
        System.out.println("发送邮件:"+event.getSource());
    }
}
@Component
public class Component2 {
    @EventListener
    public void sms(UserRegisterEvent event) {
        System.out.println("发送短信:"+event.getSource());
    }
}
运行结果:
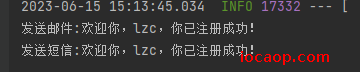
事件发布最重要的是,解耦合。在本例中,用户注册成功后,不需要将后续步骤写死为发短信或发邮件,而是发布事件,具体发送短信或邮件,由接受的组件来做。
07-BeanFactory的实现
测试类:定义两个Bean类,写一个配置类,将这两个Bean注入到ioc
public class TestBeanFactory {

    @Configuration
    static class Config {

        @Bean
        public Bean1 bean1() {
            return new Bean1();
        }

        @Bean
        public Bean2 bean2() {
            return new Bean2();
        }
    }

    static class Bean1 {
        private static final Logger logger = LoggerFactory.getLogger(Bean1.class);
        @Autowired
        private Bean2 bean2;
        public Bean1() {
            logger.info("Bean1 init");
        }

        public Bean2 getBean2() {
            return bean2;
        }
    }

    static class Bean2 {
        private static final Logger logger = LoggerFactory.getLogger(Bean2.class);

        public Bean2() {
            logger.info("Bean2 init");
        }
    }


}
主函数:分为7步,来看看BeanFactory的创建和Bean的创建
步骤1:创建beanFactory,这是核心容器,创建后,内部没有bean,需要添加bean的定义,beanFactory会根据定义创建bean
DefaultListableBeanFactory beanFactory = new DefaultListableBeanFactory();步骤2:添加bean的定义(class,scope,初始化方、销毁方法等),这是bean的描述信息
        // 这里先创建Config的定义,genericBeanDefinition设置bean的特征(单例多例等 )
        AbstractBeanDefinition beanDefinition = BeanDefinitionBuilder.genericBeanDefinition(Config.class).setScope("singleton").getBeanDefinition();
步骤3:创建好bean的定义后,使用beanFactory的registerBeanDefinition方法注册bean的定义,参数1是bean的名称,参数2是bean的定义(BeanDefinition)
        // 注册完成后,beanFactory内部就有了一个bean的定义,可以根据定义创建config的bean
        beanFactory.registerBeanDefinition("config", beanDefinition);
验证一下beanFactory中有哪些bean
        System.out.println("=============步骤3:beanFactory调用registerBeanDefinition方法注册config后容器中有哪些Bean的定义======================");
        String[] beanDefinitionNames = beanFactory.getBeanDefinitionNames();
        for (String beanDefinitionName : beanDefinitionNames) {
            System.out.println("beanDefinitionName = " + beanDefinitionName);
        }
问:beanFactory中有一个bean的定义,那为什么没有Bean1和Bean2的定义呢?
答:因为beanFactory缺少了解析@Configuration和@Bean的功能。
问:怎么让他功能完整呢?
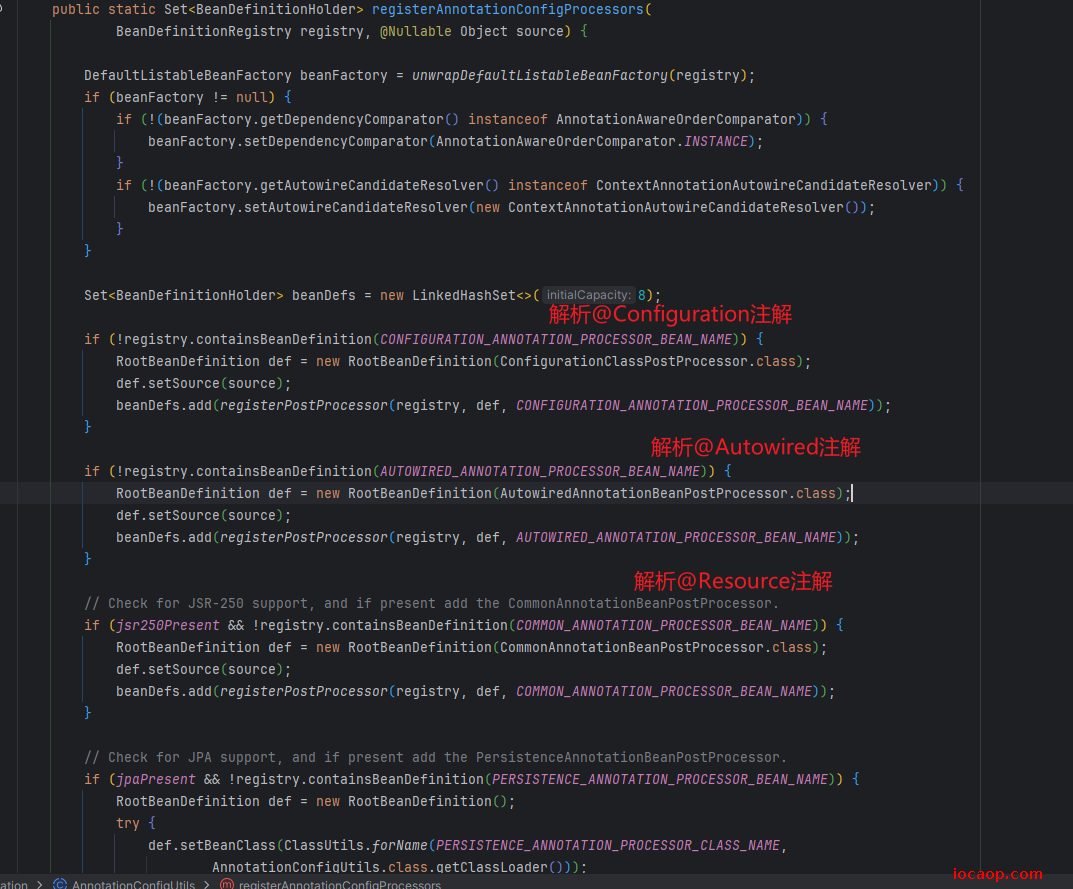
答:调用工具类AnnotationConfigUtils,这个工具类会解析@Configuration和@Bean,将解析结果添加到beanFactory中
步骤4:调用工具类AnnotationConfigUtils,会给beanFactory添加一些常用的后置处理器,对beanFactory的功能做一些扩展
AnnotationConfigUtils.registerAnnotationConfigProcessors(beanFactory);验证一下beanFactory中有哪些bean
        System.out.println("==============步骤4:使用工具类AnnotationConfigUtils注册后置处理器后beanFactory中有哪些Bean的定义=====================");
        beanDefinitionNames = beanFactory.getBeanDefinitionNames();
        for (String beanDefinitionName : beanDefinitionNames) {
            System.out.println("beanDefinitionName = " + beanDefinitionName);
        }
多出了很多
Bean这些Bean是注解后置处理器,看名字大概就能猜到作用了。步骤5:获取这些后置处理器,这些后置处理器统一类型为:BeanFactoryPostProcessor,这些后置处理器会对beanFactory做一些扩展
Map<String, BeanFactoryPostProcessor> beansOfType = beanFactory.getBeansOfType(BeanFactoryPostProcessor.class);逐一执行这些后置处理器,效果:会对注解@Configuration和@Bean进行解析,将解析结果添加到beanFactory中:
beansOfType.values().stream().forEach(beanFactoryPostProcessor -> beanFactoryPostProcessor.postProcessBeanFactory(beanFactory));执行解析后打印一下beanFactory中有哪些bean:
        System.out.println("==============步骤5:获取这些后置处理器并逐一执行后,BeanFactory中有哪些Bean的定义=====================");
        beanDefinitionNames = beanFactory.getBeanDefinitionNames();
        for (String beanDefinitionName : beanDefinitionNames) {
            System.out.println("beanDefinitionName = " + beanDefinitionName);
        }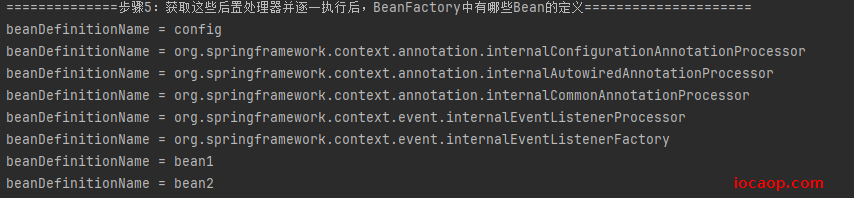
可以看到,已经将
bean1和bean2加入到beanFactory中了。beanFactory的后置处理器的主要功能:对beanFactory做扩展,补充了Bean的定义。
主函数完整代码:
    public static void main(String[] args) {
        // 1.创建beanFactory,这是核心容器,创建后,内部没有bean,需要添加bean的定义,beanFactory会根据定义创建bean
        DefaultListableBeanFactory beanFactory = new DefaultListableBeanFactory();
        // 2.添加bean的定义(class,scope,初始化方、销毁方法等),这是bean的描述信息
        // 这里先创建Config的定义,genericBeanDefinition设置bean的特征(单例多例等 )
        AbstractBeanDefinition beanDefinition = BeanDefinitionBuilder.genericBeanDefinition(Config.class).setScope("singleton").getBeanDefinition();
        // 3.创建好bean的定义后,使用beanFactory的registerBeanDefinition方法注册bean的定义,参数1是bean的名称,参数2是bean的定义
        // 注册完成后,beanFactory内部就有了一个bean的定义,可以根据定义创建config的bean
        beanFactory.registerBeanDefinition("config", beanDefinition);

        // 验证一下beanFactory中有哪些bean
        System.out.println("=============步骤3:beanFactory调用registerBeanDefinition方法注册config后容器中有哪些Bean的定义======================");
        String[] beanDefinitionNames = beanFactory.getBeanDefinitionNames();
        for (String beanDefinitionName : beanDefinitionNames) {
            System.out.println("beanDefinitionName = " + beanDefinitionName);
        }
        // 结果:beanDefinitionName = config,说明beanFactory中有一个bean的定义,那为什么没有Bean1和Bean2的定义呢?
        // 因为beanFactory缺少了解析@Configuration和@Bean的功能,怎么让他功能完整呢?
        // 4.调用工具类AnnotationConfigUtils,这个工具类会解析@Configuration和@Bean,将解析结果添加到beanFactory中
        // 会给beanFactory添加一些常用的后置处理器,对beanFactory的功能做一些扩展
        AnnotationConfigUtils.registerAnnotationConfigProcessors(beanFactory);
        // 验证一下beanFactory中有哪些bean
        System.out.println("==============步骤4:使用工具类AnnotationConfigUtils注册后置处理器后beanFactory中有哪些Bean的定义=====================");
        beanDefinitionNames = beanFactory.getBeanDefinitionNames();
        for (String beanDefinitionName : beanDefinitionNames) {
            System.out.println("beanDefinitionName = " + beanDefinitionName);
        }
/*      结果:
        beanDefinitionName = config
        beanDefinitionName = org.springframework.context.annotation.internalConfigurationAnnotationProcessor  // @Configuration注解的后置处理器,解析@Configuration注解以及@Bean注解
        beanDefinitionName = org.springframework.context.annotation.internalAutowiredAnnotationProcessor      //
        beanDefinitionName = org.springframework.context.annotation.internalCommonAnnotationProcessor
        beanDefinitionName = org.springframework.context.event.internalEventListenerProcessor
        beanDefinitionName = org.springframework.context.event.internalEventListenerFactory
*/
        //

        // 5.获取这些后置处理器,这些后置处理器统一类型为:BeanFactoryPostProcessor,这些后置处理器会对beanFactory做一些扩展
        Map<String, BeanFactoryPostProcessor> beansOfType = beanFactory.getBeansOfType(BeanFactoryPostProcessor.class);
        // 逐一执行这些后置处理器,效果:会对注解@Configuration和@Bean进行解析,将解析结果添加到beanFactory中
        beansOfType.values().stream().forEach(beanFactoryPostProcessor -> beanFactoryPostProcessor.postProcessBeanFactory(beanFactory));
        // 解析之后再打印一下beanFactory中有哪些bean
        System.out.println("==============步骤5:获取这些后置处理器并逐一执行后,BeanFactory中有哪些Bean的定义=====================");
        beanDefinitionNames = beanFactory.getBeanDefinitionNames();
        for (String beanDefinitionName : beanDefinitionNames) {
            System.out.println("beanDefinitionName = " + beanDefinitionName);
        }
        // 后置处理器的主要功能:对beanFactory做扩展,补充了Bean的定义
    }
08-BeanFactory的实现
步骤6:获取
Bean1,再通过Bean1获取Bean2// 6.获取beanFactory中的bean System.out.println("==============步骤6:获取beanFactory中的bean====================="); Bean1 bean1 = beanFactory.getBean(Bean1.class); System.out.println("bean1 = " + bean1); System.out.println("bean1.getBean2() = " + bean1.getBean2());
Bean1可以获取,但是Bean1中自动装配进来的Bean2为null,是因为@Autowired没有起作用。这个功能对于
BeanFactory来说也是扩展功能,是由另外的Bean的后置处理器来实现的(在Config类我们就学习了internalConfigurationAnnotationProcessor,注解后置处理器)。处理自动装配的处理器叫做Bean的后置处理器,这些处理器可以解析@Autowired注解。Bean的后置处理器介绍
Bean的后置处理器在工具类AnnotationConfigUtils中也包含:internalAutowiredAnnotationProcessor,作用就是解析@Autowired和@Value等注解。internalCommonAnnotationProcessor后置处理器是解析@Resource注解的,这不是Spring的注解,是JavaEE的注解。Bean的后置处理器在Bean的生命周期的各个阶段,提供一些扩展功能,例如:@Autowired、@Resource
步骤7:让Bean的后置处理器起作用
        beanFactory.getBeansOfType(BeanPostProcessor.class).values().forEach(beanFactory::addBeanPostProcessor);
        System.out.println("==============步骤7:获取beanFactory中的bean=====================");
        Bean1 bean1 = beanFactory.getBean(Bean1.class);
        System.out.println("bean1 = " + bean1);
        System.out.println("bean1.getBean2() = " + bean1.getBean2());
这里需要把步骤6中的代码注释,因为Bean的后处理器作用是在Bean的生命周期各个阶段提供功能扩展,如果不把步骤6中的代码注释,Bean在步骤6中进行获取的时候,已经创建完成了(就进入Bean的生命周期,就会调用Bean的后置处理器),但是当时没有添加internalAutowiredAnnotationProcessor这个Bean的后处理器,Bean2还是会为null
在步骤3中已经使用:
AnnotationConfigUtils.registerAnnotationConfigProcessors(beanFactory);添加了Bean的后置处理器,为什么还要在步骤7中使用:
beanFactory.getBeansOfType(BeanPostProcessor.class).values().forEach(beanFactory::addBeanPostProcessor);步骤3只是把Bean的后置处理器添加到BeanFactory(Bean的后置处理器只是存在于BeanFactory中的Bean而已),步骤7是建立BeanFactory与Bean的后置处理器之间的联系(告诉BeanFactory,将来该Bean工厂中的Bean创建时需要用哪些后置处理器)。
看日志可以知道,BeanFactory中的Bean不是在Bean工厂创建的时候把所有Bean都创建,而是用到的时候,调用构造函数去创建。刚开始都是创建
BeanDefinition,保存了Bean的描述信息,默认都是延迟创建的,当用到Bean的时候,才会创建Bean。BeanFactory中的单例Bean可以在Bean工厂创建的时候就创建这些单例Bean,调用一下方法就好了:// 预先实例化所有的单例对象,走完依赖注入、初始化等流程 beanFactory.preInstantiateSingletons();
BeanFactory和ApplicationContext还是有些区别的。BeanFactory不会主动做一些事情:
- 不会主动调用BeanFactory的后置处理器(不会主动解析
@Configuration和@Bean注解,补充Bean的定义) - 不会主动添加Bean的后置处理器(解析
@Autowired等注解) - 不会主动初始化单例Bean
- 不会解析BeanFactory,不会解析${}和el表达式#{}
Bean的后置处理器有排序的逻辑。
BeanFactory是一个基础的东西,很多扩展功能都没有加入到BeanFactory体系中来,而ApplicationContext会把这些事做好,都会帮加好。
09-BeanFactory的实现
AnnotationConfigUtils.registerAnnotationConfigProcessors(beanFactory);
问题:如果在依赖注入时,即加了@Autowired又加了@Resource,会怎么样?谁先生效?
在原来代码上,新加一个接口,两个实现类:
    interface Inter{}

    static class Bean3 implements Inter{
        private static final Logger logger = LoggerFactory.getLogger(Bean1.class);

        public Bean3(){
            logger.info("Bean3 init");
        }
    }

    static class Bean4 implements Inter{
        private static final Logger logger = LoggerFactory.getLogger(Bean1.class);
        public Bean4(){
            logger.info("Bean4 init");
        }
    }
在Config中使用@Bean加入到容器中:
    @Configuration
    static class Config {

        @Bean
        public Bean1 bean1() {
            return new Bean1();
        }

        @Bean
        public Bean2 bean2() {
            return new Bean2();
        }

        @Bean
        public Inter bean3(){
            return new Bean3();
        }

        @Bean
        public Inter bean4(){
            return new Bean4();
        }
    }
还是用原来的代码,原来的代码使用了
AnnotationConfigUtils.registerAnnotationConfigProcessors(beanFactory);会补充Bean的定义,所以这些Bean会被加入到容器中
在原来的Bean1中使用注解装配并获取Inter
    static class Bean1 {
        private static final Logger logger = LoggerFactory.getLogger(Bean1.class);
        @Autowired
        private Bean2 bean2;

        @Autowired
        private Inter inter;
        public Bean1() {
            logger.info("Bean1 init");
        }

        public Bean2 getBean2() {
            return bean2;
        }

        public Inter getInter(){
            return this.inter;
        }
    }
这样写会报错,因为使用接口类型获取,@Autowired注入时是根据类型匹配,有多个,不知道要注入哪一个,需要指定Bean的名称,或者修改变量名与类名一致,修改如下:(用@Qualifier也行)
        @Autowired
        private Inter bean3;

        public Inter getInter(){
            return this.bean3;
        }
        // 8.获取beanFactory中的Inter
        System.out.println("==============步骤8:获取beanFactory中的Inter,使用@Autowired注解注入接口,但是变量名是Bean3=====================");
        System.out.println("beanFactory.getBean(Bean1.class).getInter() = " + beanFactory.getBean(Bean1.class).getInter());
运行后获取到的Bean的类型是和变量名对应类名相匹配的Bean:

再来试一下Resource:变量名是bean3但是注解参数指定的Bean名称是bean4
//        @Autowired
        @Resource(name = "bean4")
        private Inter bean3;
        System.out.println("==============步骤9:获取beanFactory中的Inter,使用@Resource注解注入接口,但是变量名是Bean4=====================");
        System.out.println("beanFactory.getBean(Bean1.class).getInter() = " + beanFactory.getBean(Bean1.class).getInter());
最终获取到的Bean的类型是Bean4:

那如果即加@Autowired又加Resource,会怎么样?
        @Autowired
        @Resource(name = "bean4")
        private Inter bean3;
        // 10 即加@AutoWired又加@Resouce
        System.out.println("==============步骤10:即加@AutoWired又加@Resouce=====================");
        System.out.println("beanFactory.getBean(Bean1.class).getInter() = " + beanFactory.getBean(Bean1.class).getInter());

最终注入的是Bean3,为什么?
跟Bean的后置处理器的顺序有关系,谁先被添加,谁就先执行。
验证一下我们添加Bean的后置处理器的顺序:在步骤7中,打印出Bean的后置处理器,再添加。
        // 7.让Bean的后置处理器起作用:通过类型获取所有的Bean后置处理器,并添加到beanFactory中
        beanFactory.getBeansOfType(BeanPostProcessor.class).values().forEach(beanPostProcessor -> {
            System.out.println("添加beanPostProcessor = " + beanPostProcessor);
            beanFactory.addBeanPostProcessor(beanPostProcessor);
        });

可以看到是先添加了AutowiredAnnotationBeanPostProcessor后添加CommonAnnotationBeanPostProcessor,所以先执行了解析@AutoWired的Bean后置处理器,所以装配进来的是Bean3类型。
加个比较器,打乱一下顺序:
        beanFactory.getBeansOfType(BeanPostProcessor.class).values().stream().sorted(beanFactory.getDependencyComparator()).forEach(beanPostProcessor -> {
            System.out.println("添加beanPostProcessor = " + beanPostProcessor);
            beanFactory.addBeanPostProcessor(beanPostProcessor);
        });
顺序换了:

这样,注入的类型就是@Resource(name = "bean4"):

这个比较器哪来的?在AnnotationConfigUtils工具类注册BeanFactory的后置处理器时设置给BeanFactory的。
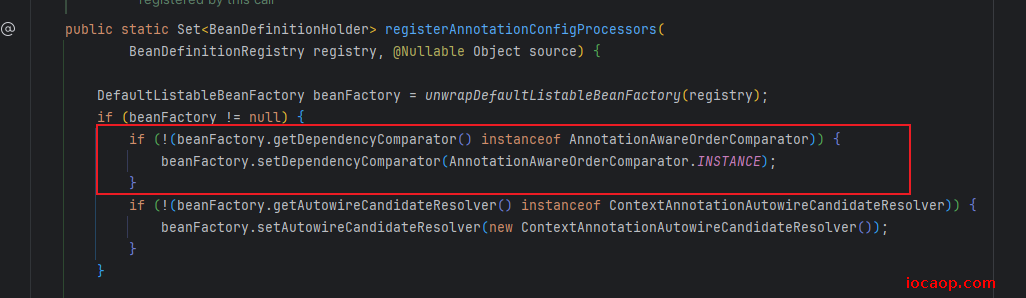
这个比较器使用的是单例模式中的饿汉模式。
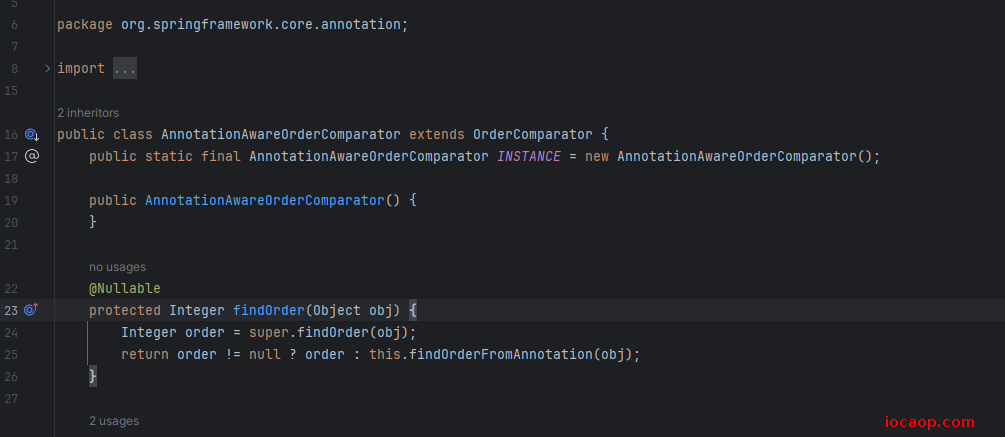
打开CommonAnnotationBeanPostProcessor源码,Ctrl+F12搜索getOrder()方法:
点击后跳转到父类:InitDestroyAnnotationBeanPostProcessor,看到父类实现了接口PriorityOrdered,间接也实现了接口Ordered
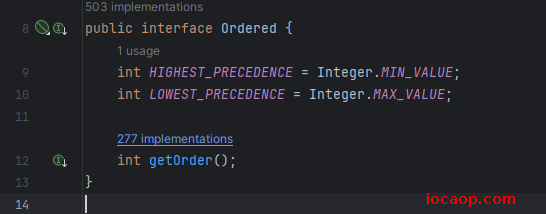
那么CommonAnnotationBeanPostProcessor和AutowiredAnnotationBeanPostProcessor的优先级谁高谁低在哪里设置的呢?
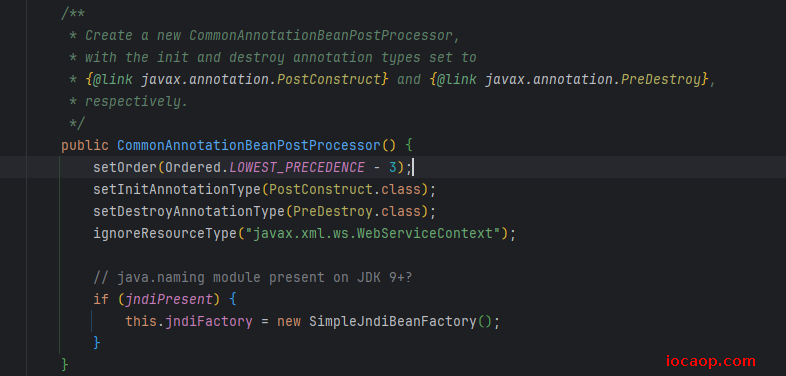
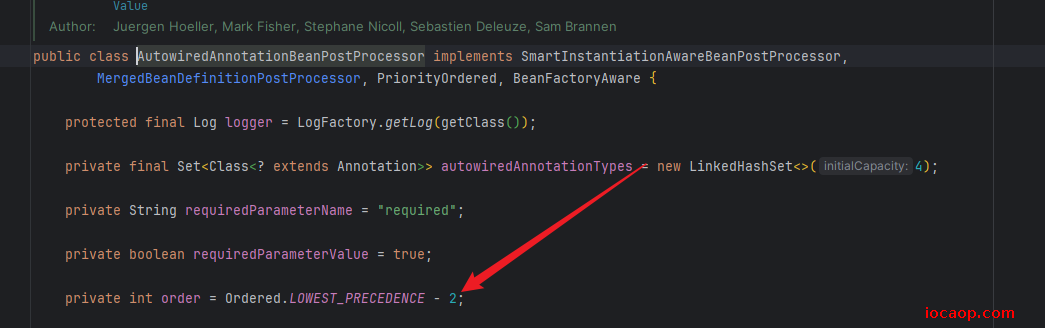
数字越小的,优先级越高,所以CommonAnnotationBeanPostProcessor排在前面。
10~12-ApplicationContext的实现
学习4个比较典型的实现类。
ClassPathXmlApplicationContext/** * 测试ClassPathXmlApplicationContext */ public void testClassPathXmlApplicationContext() { // 传入配置文件路径,会根据配置文件创建bean ClassPathXmlApplicationContext context = new ClassPathXmlApplicationContext("b01.xml"); }传入的xml文件放在类路径下(resources),xml中的内容就是Bean的定义,其实就是定义
BeanDefinition,只不过是用xml的形式来指定Bean的特征(类型、名字、单例多例、初始化、销毁方法等)先创建两个Bean类:
Bean1和Bean2,Bean2依赖了Bean1,并提供了get、set方法,没有使用注解装配,而是使用set方法进行注入。
    static class Bean1{

    }

    static class Bean2{

        private Bean1 bean1;

        public Bean2(){
            System.out.println("Bean2 init");
        }

        public void setBean1(Bean1 bean1) {
            this.bean1 = bean1;
        }

        public Bean1 getBean1() {
            return bean1;
        }
    }
在xml中如何配置呢:
<?xml version="1.0" encoding="UTF-8"?>
<beans xmlns="http://www.springframework.org/schema/beans"
       xmlns:xsi="http://www.w3.org/2001/XMLSchema-instance"
       xsi:schemaLocation="http://www.springframework.org/schema/beans http://www.springframework.org/schema/beans/spring-beans.xsd">

    <bean id="bean1" class="com.lzc.spring.TestApplicationContext.Bean1"/>

    <bean id="bean2" class="com.lzc.spring.TestApplicationContext.Bean2">
        <property name="bean1" ref="bean1"/>
    </bean>

</beans>
idea快速创建xml:

运行:
    /**
     * 测试ClassPathXmlApplicationContext
     */
    public static void testClassPathXmlApplicationContext() {
        // 传入配置文件路径,会根据配置文件创建bean
        ClassPathXmlApplicationContext context = new ClassPathXmlApplicationContext("b01.xml");

        // 获取容器中所有Bean的名称
        String[] beanDefinitionNames = context.getBeanDefinitionNames();
        for (String beanDefinitionName : beanDefinitionNames) {
            System.out.println("beanDefinitionName = " + beanDefinitionName);
        }

        // 获取Bean2,并打印Bean2中的Bean1
        Bean2 bean2 = context.getBean(Bean2.class);
        System.out.println("bean2.getBean1() = " + bean2.getBean1());
    }
FileSystemXmlApplicationContext和
ClassPathXmlApplicationContext一样,但是传入的是磁盘路径,而不是类路径classpathpublic static void testFileSystemXmlApplicationContext() { // 传入配置文件路径,会根据配置文件创建bean FileSystemXmlApplicationContext context = new FileSystemXmlApplicationContext("D:\\lzc-sync\\code\\java-workspace\\spring\\src\\main\\resources\\b01.xml"); // 获取容器中所有Bean的名称 String[] beanDefinitionNames = context.getBeanDefinitionNames(); for (String beanDefinitionName : beanDefinitionNames) { System.out.println("beanDefinitionName = " + beanDefinitionName); } // 获取Bean2,并打印Bean2中的Bean1 Bean2 bean2 = context.getBean(Bean2.class); System.out.println("bean2.getBean1() = " + bean2.getBean1()); }
上面两种ApplicationContext的实现的运行原理是:
1.创建BeanFactory,刚开始里面没有任何Bean
DefaultListableBeanFactory beanFactory = new DefaultListableBeanFactory();
2.借助XmlBeanDefinitionReader读取xml中Bean的定义,创建好BeanDefinition,加入到这个BeanFactory中
        // 读取配置文件
        XmlBeanDefinitionReader reader = new XmlBeanDefinitionReader(beanFactory);
        reader.loadBeanDefinitions("b01.xml");
3.更多功能,加Bean后处理器、BeanFactory后置处理器、初始化单例Bean等。
完整代码:
    public static void main(String[] args) {
        // 创建一个BeanFactory
        DefaultListableBeanFactory beanFactory = new DefaultListableBeanFactory();

        // 读取之前打印的BeanDefinition名称
        System.out.println("读取之前打印的BeanDefinition名称");
        String[] beanDefinitionNames = beanFactory.getBeanDefinitionNames();
        for (String beanDefinitionName : beanDefinitionNames) {
            System.out.println("beanDefinitionName = " + beanDefinitionName);
        }

        // 读取配置文件
        XmlBeanDefinitionReader reader = new XmlBeanDefinitionReader(beanFactory);
        reader.loadBeanDefinitions("b01.xml");

        // 读取之后打印的BeanDefinition名称
        System.out.println("读取之后打印的BeanDefinition名称");
        String[] definitionNames = beanFactory.getBeanDefinitionNames();
        for (String beanDefinitionName : definitionNames) {
            System.out.println("beanDefinitionName = " + beanDefinitionName);
        }
    }

AnnotationConfigApplicationContext写个配置类:
    @Configuration
    static class Config{
        @Bean
        public Bean1 bean1(){
            return new Bean1();
        }

        @Bean
        public Bean2 bean2(Bean1 bean1){
            Bean2 bean2 = new Bean2();
            bean2.setBean1(bean1);
            return bean2;
        }
    }
public static void testAnnotationConfigApplicationContext(){ // 将配置类作为参数,传递给AnnotationConfigApplicationContext AnnotationConfigApplicationContext context = new AnnotationConfigApplicationContext(Config.class); // 获取容器中所有Bean的名称 String[] beanDefinitionNames = context.getBeanDefinitionNames(); for (String beanDefinitionName : beanDefinitionNames) { System.out.println("beanDefinitionName = " + beanDefinitionName); } // 获取Bean2,并打印Bean2中的Bean1 Bean2 bean2 = context.getBean(Bean2.class); System.out.println("bean2.getBean1() = " + bean2.getBean1()); }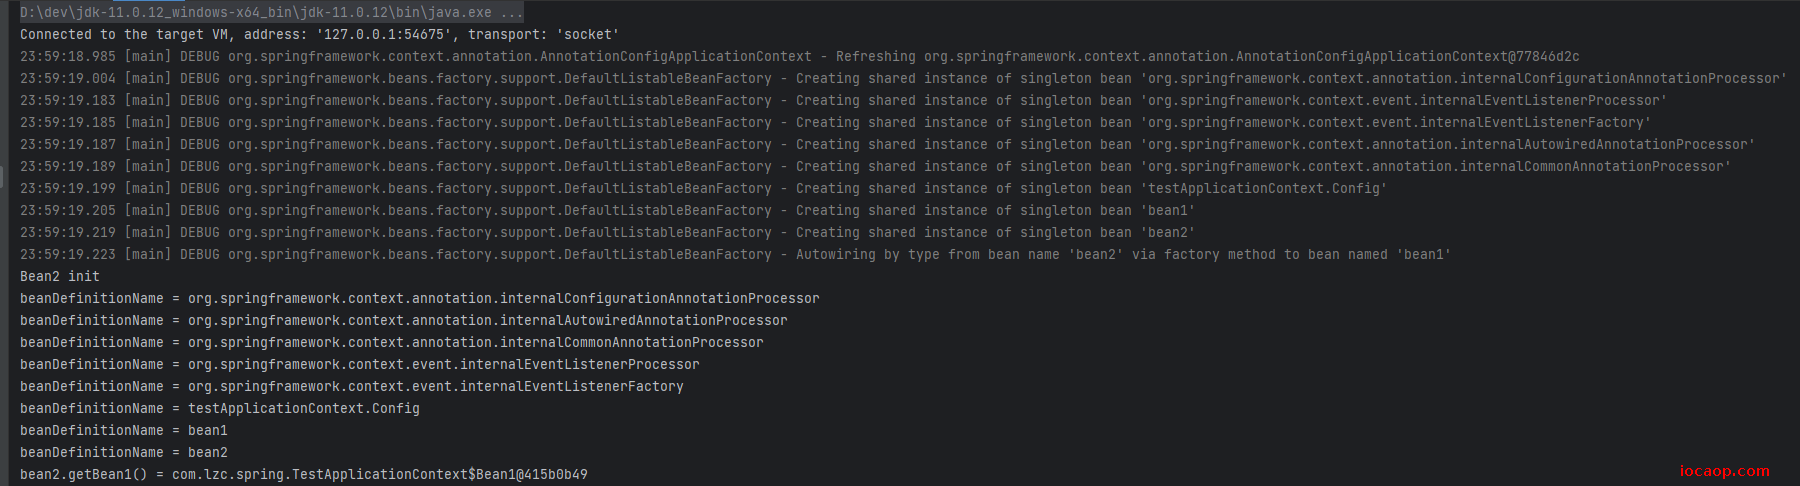
与之前xml的有什么区别?
除了
Bean1和Bean2,Config也在容器中,只不过这个类的作用是接下来提供更多的BeanDefinition,除此之外,还加入了Bean的后置处理器,在图中的Debug日志中可以看到。前两种xml的是没有的,需要自己手动去加:<context:annotation-config/>然后再启动上面的
ClassPathXmlApplicationContext例子:也会有这几个Bean的后置处理器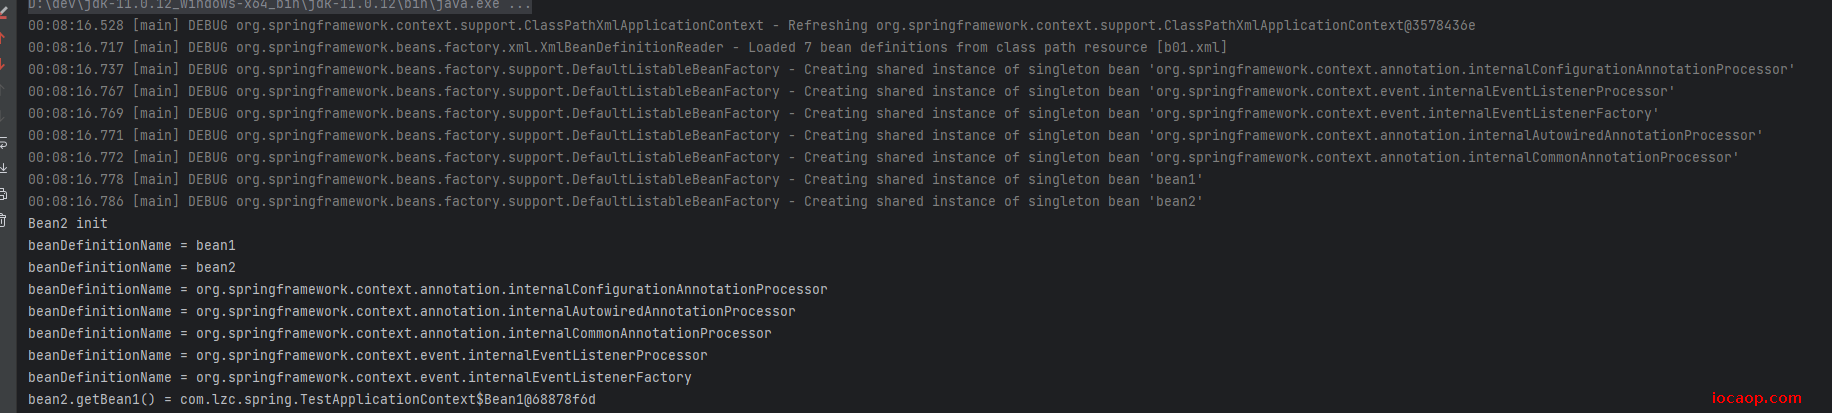
相关搜索:点击跳转
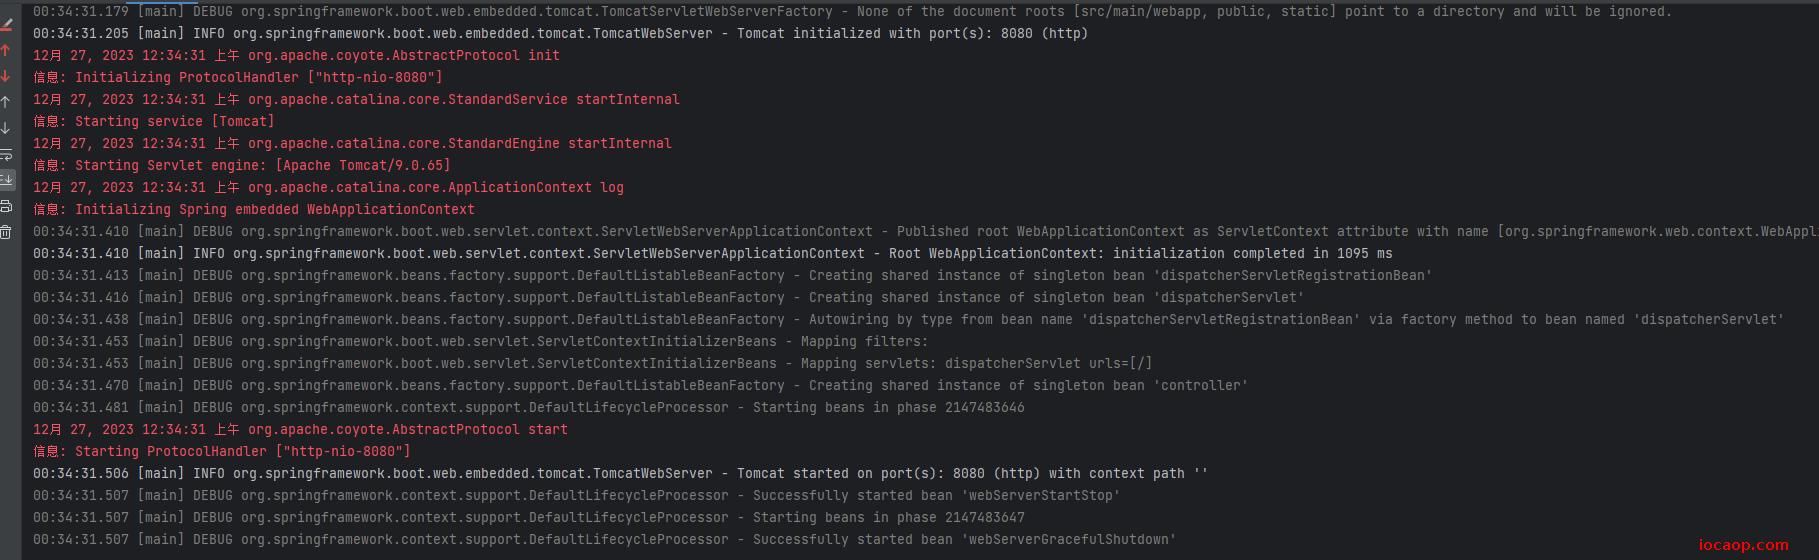
AnnotationConfigServletWebServerApplicationContext,内嵌web容器(tomcat)的ioc容器先写个配置类:
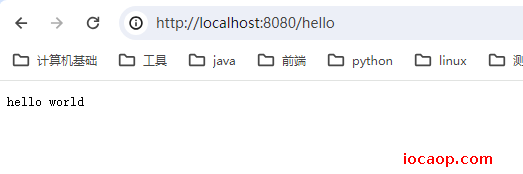
    /**
     * web配置 最少需要三个bean  1、DispatcherServlet 2、ServletWebServerFactory
     */
    @Configuration
    static class WebConfig{

        /**
         * 创建web容器
         * @return
         */
        @Bean
        public ServletWebServerFactory servletWebServerFactory(){
            return new TomcatServletWebServerFactory();
        }

        /**
         *  前控制器 所有请求都会经过这个servlet
         * @return
         */
        @Bean
        public DispatcherServlet dispatcherServlet(){
            return new DispatcherServlet();
        }

        /**
         * Servlet是运行在Tomcat容器中的,需要将DispatcherServlet注册到Tomcat容器中
         */
        @Bean
        public DispatcherServletRegistrationBean dispatcherServletRegistrationBean(DispatcherServlet dispatcherServlet){
            // 参数1 需要注册的servlet 参数2 路径
            return new DispatcherServletRegistrationBean(dispatcherServlet, "/");
        }

        /**
         * 加一个控制器 用于呈现效果 Bean的名称如果以/开头,会被认为是一个路径,将来访问时,可以通过路径访问到这个Controller
         */
        @Bean("/hello")
        public Controller controller (){

            return new Controller() {
                @Override
                public ModelAndView handleRequest(HttpServletRequest request, HttpServletResponse response) throws Exception {
                    response.getWriter().println("hello world");
                    return null;
                }
            };
        }

    }
构造传参:
    public static void testAnnotationConfigServletWebServerApplicationContext(){
        // 创建时指定配置类,
        AnnotationConfigServletWebServerApplicationContext context = new AnnotationConfigServletWebServerApplicationContext(WebConfig.class);

    }
启动:
13-Bean的生命周期
先大致看一下生命周期,创建一个Bean用来体现生命周期:
/**
 * 生命周期Bean
 *
 * @author 赖卓成
 * @date 2024/01/03
 */
@Component
public class LifeCycleBean {

    private static final Logger log = LoggerFactory.getLogger(LifeCycleBean.class);

    public LifeCycleBean() {
        log.info("构造");
    }

    /**
     * 这里做依赖注入,注入环境变量
     *
     * @param home 达梦数据库home
     */
    @Autowired
    public void autowire(@Value("${DM_HOME}") String home){
        log.info("依赖注入,{}",home);
    }

    @PostConstruct
    public void init(){
        log.info("初始化");
    }

    @PreDestroy
    public void destroy(){
        log.info("销毁");
    }
}
启动类:
@SpringBootApplication
public class BeanLifePeriod {
    public static void main(String[] args) {
        ConfigurableApplicationContext run = SpringApplication.run(BeanLifePeriod.class, args);
        run.close();
    }
}
启动可以看到日志:
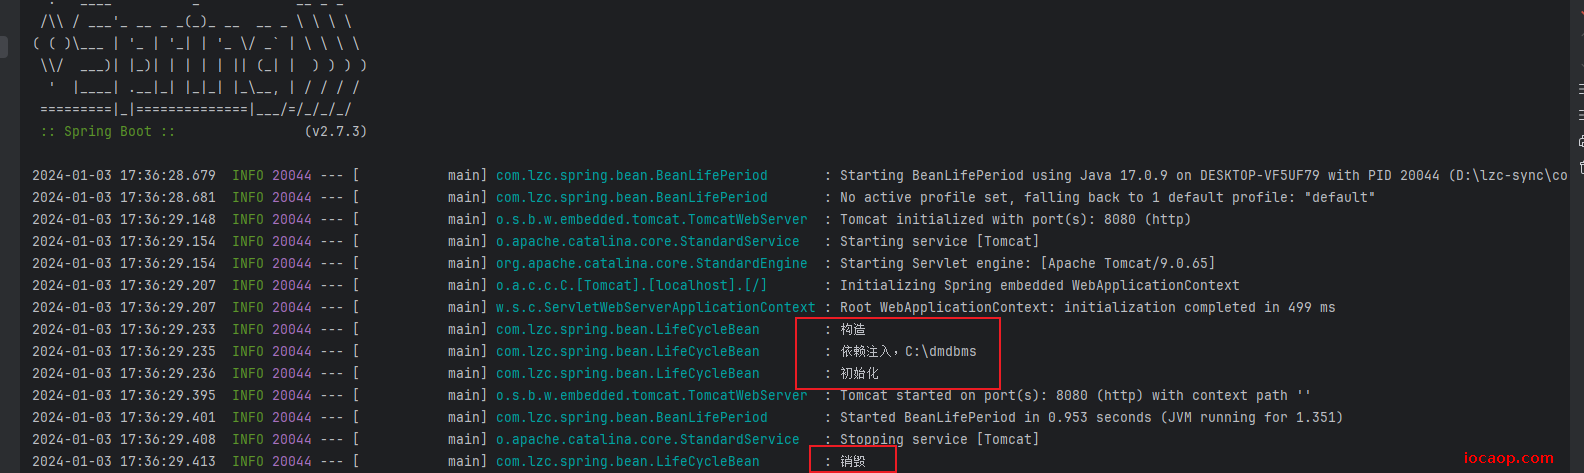
小结:
Bean的生命周期:
- 执行构造方法创建Bean
- 依赖注入
- 初始化
- IOC容器关闭之前销毁Bean
之前学习过很多后置处理器,其中有一种叫做BeanFactory后置处理器主要作用是补充Bean的定义,另一种是Bean的后置处理器。
跟Bean生命周期相关的是Bean的后置处理器,重写一下InstantiationAwareBeanPostProcessor和DestructionAwareBeanPostProcessor的方法,体会一下Bean各个生命周期时Bean的后置处理器提供的增强:
@Component
public class MyPostProcessor implements InstantiationAwareBeanPostProcessor, DestructionAwareBeanPostProcessor {

    private static final Logger log = LoggerFactory.getLogger(MyPostProcessor.class);

    @Override
    public void postProcessBeforeDestruction(Object bean, String beanName) throws BeansException {
        if (beanName.equals("lifeCycleBean")){
            log.info("<<<<<<<<<销毁之前执行,如@PreDestroy");
        }
    }

    @Override
    public boolean requiresDestruction(Object bean) {
        return DestructionAwareBeanPostProcessor.super.requiresDestruction(bean);
    }

    @Override
    public Object postProcessBeforeInstantiation(Class<?> beanClass, String beanName) throws BeansException {
        if (beanName.equals("lifeCycleBean")){
            log.info("<<<<<<<<<实例化之前执行,这里返回的对象会替换掉原来的Bean");
        }
        return null;
    }

    @Override
    public boolean postProcessAfterInstantiation(Object bean, String beanName) throws BeansException {
        if (beanName.equals("lifeCycleBean")){
            log.info("<<<<<<<<<实例化之后执行,这里如果返回false,则会跳过依赖注入阶段");
        }
        return true;
    }

    @Override
    public PropertyValues postProcessProperties(PropertyValues pvs, Object bean, String beanName) throws BeansException {
        if (beanName.equals("lifeCycleBean")){
            log.info("<<<<<<<<<依赖注入阶段执行,如@Autowired,@Value,@Resource");
        }
        return pvs;
    }


    @Override
    public Object postProcessBeforeInitialization(Object bean, String beanName) throws BeansException {
        if (beanName.equals("lifeCycleBean")){
            log.info("<<<<<<<<<初始化之前执行,这里返回的对象会替换掉原来的Bean,如@PostConstruct、@ConfigurationProperties");
        }
        return bean;
    }

    @Override
    public Object postProcessAfterInitialization(Object bean, String beanName) throws BeansException {
        if (beanName.equals("lifeCycleBean")){
            log.info("<<<<<<<<<初始化之后执行,这里返回的对象会替换掉原来的Bean,如代理增强");
        }
        return bean;
    }
}
运行:

小结:
Bean的创建,即构造方法前后做了增强:前处理和Bean,后根据返回值决定是否进入依赖注入阶段
依赖注入时:处理
@Autowired,@Value,@ResourceBean初始化前后:前处理
@PostConstruct、@ConfigurationProperties,后做代理增强,替换原来的Bean销毁前:处理
@PreDestroy
14-模板设计模式
可以看到在Bean的后置处理器中,有很多扩展功能,那么来模拟一下Bean的生命周期,并且模拟Bean的后置处理器,模拟一下扩展功能。
    static class MyBeanFactory{
        public Object getBean(){
            Object bean = new Object();
            System.out.println("执行构造方法");
            System.out.println("依赖注入");
            System.out.println("初始化");
            System.out.println("销毁");
            return bean;
        }
    }
这时候需要在初始化时增加功能,如处理@Autowired,过了一段时间又要处理@Value,如何优雅实现?
使用模板设计模式:
/**
 * 模拟bean后处理器
 *
 * @author 赖卓成
 * @date 2024/01/03
 */
public class SimulateBeanPostProcessor {

    public static void main(String[] args) {

        MyBeanFactory beanFactory = new MyBeanFactory();
        beanFactory.addBeanPostProcessor(new BeanPostProcessor() {
            @Override
            public void inject(Object Bean) {
                System.out.println("处理@Autowired注解");
            }
        });
        Object bean = beanFactory.getBean();

    }


    /**
     * 模拟BeanFactory
     *
     * @author 赖卓成
     * @date 2024/01/03
     */
    static class MyBeanFactory{
        public Object getBean(){
            Object bean = new Object();
            System.out.println("执行构造方法");
            System.out.println("依赖注入");
            System.out.println("初始化");
            beanPostProcessorList.forEach(b->b.inject(bean));
            System.out.println("销毁");
            return bean;
        }

        /**
         * bean后处理器列表
         */
        private List<BeanPostProcessor> beanPostProcessorList = new ArrayList<>();

        /**
         * 添加bean后处理器
         *
         * @param beanPostProcessor bean后处理器
         */
        public void addBeanPostProcessor(BeanPostProcessor beanPostProcessor){
            this.beanPostProcessorList.add(beanPostProcessor);
        }

    }

    /**
     * 模拟bean后处理器,定义接口
     *
     * @author 赖卓成
     * @date 2024/01/03
     */
    static interface BeanPostProcessor{
        void inject(Object Bean);
    }
}
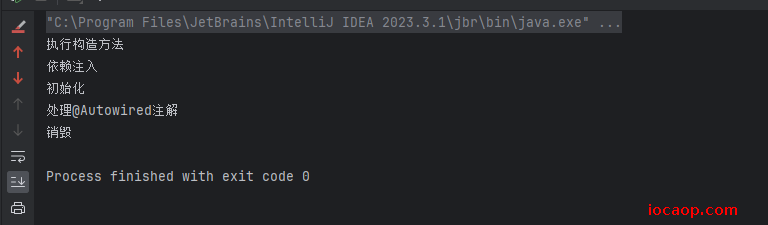
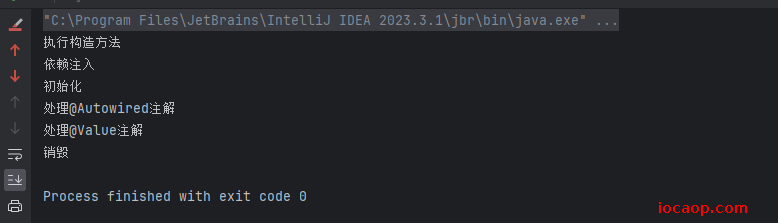
当我们需要增加功能时,多写一个实现,添加到列表中就可以了。如添加@Value注解处理器:
    public static void main(String[] args) {

        MyBeanFactory beanFactory = new MyBeanFactory();
        beanFactory.addBeanPostProcessor(Bean -> System.out.println("处理@Autowired注解"));
        beanFactory.addBeanPostProcessor(Bean -> System.out.println("处理@Value注解"));
        Object bean = beanFactory.getBean();

    }
15~16-常见的Bean的后置处理器
先创建一个干净的ApplicationContext,然后注册Bean,启动后看看效果:
/**
 * 测试Bean的后置处理器
 *
 * @author 赖卓成
 * @date 2024/01/05
 */
public class TestBeanPostProcessor01 {

    public static void main(String[] args) {
        // 一个干净的Spring容器 为什么说是干净的?因为没有注册任何bean的后置处理器 不会干扰测试
        GenericApplicationContext context = new GenericApplicationContext();
        // 注册Bean1
        context.registerBean("bean1",Bean1.class);
        context.registerBean("bean2",Bean2.class);
        context.registerBean("bean3",Bean3.class);

        // 初始化Spring容器 执行BeanFactoryPostProcessor BeanPostProcessor 初始化单例bean
        context.refresh();

        // 关闭容器
        context.close();
    }
}
public class Bean1 {

    public static Logger logger = LoggerFactory.getLogger(Bean1.class);

    private Bean2 bean2;

    private Bean3 bean3;

    private String os;

    public Bean1() {
        logger.info("构造");
    }

    @Autowired
    public void setBean2(Bean2 bean2) {
        logger.info("@Autowired生效,注册Bean2,{}",bean2);
        this.bean2 = bean2;
    }

    @Autowired
    public void setBean3(Bean3 bean3) {
        logger.info("@Autowired生效,注册Bean3,{}",bean3);
        this.bean3 = bean3;
    }

    @Autowired
    public void setOs(@Value("${OS}") String os) {
        logger.info("@Autowired生效,注册home,{}",os);
        this.os = os;
    }

    @PostConstruct
    public void init(){
        logger.info("@PostConstruct生效,初始化");
    }


    @PreDestroy
    public void destroy(){
        logger.info("@PreDestroy生效,销毁");
    }


    @Override
    public String toString() {
        return "Bean1{" +
                "bean2=" + bean2 +
                ", bean3=" + bean3 +
                ", home='" + os + '\'' +
                '}';
    }
}
public class Bean2 {

    private static Logger logger = LoggerFactory.getLogger(Bean2.class);

    public Bean2() {
        logger.info("Bean2构造");
    }
}
public class Bean3 {

    private static Logger logger = LoggerFactory.getLogger(Bean3.class);

    public Bean3() {
        logger.info("Bean3构造");
    }
}
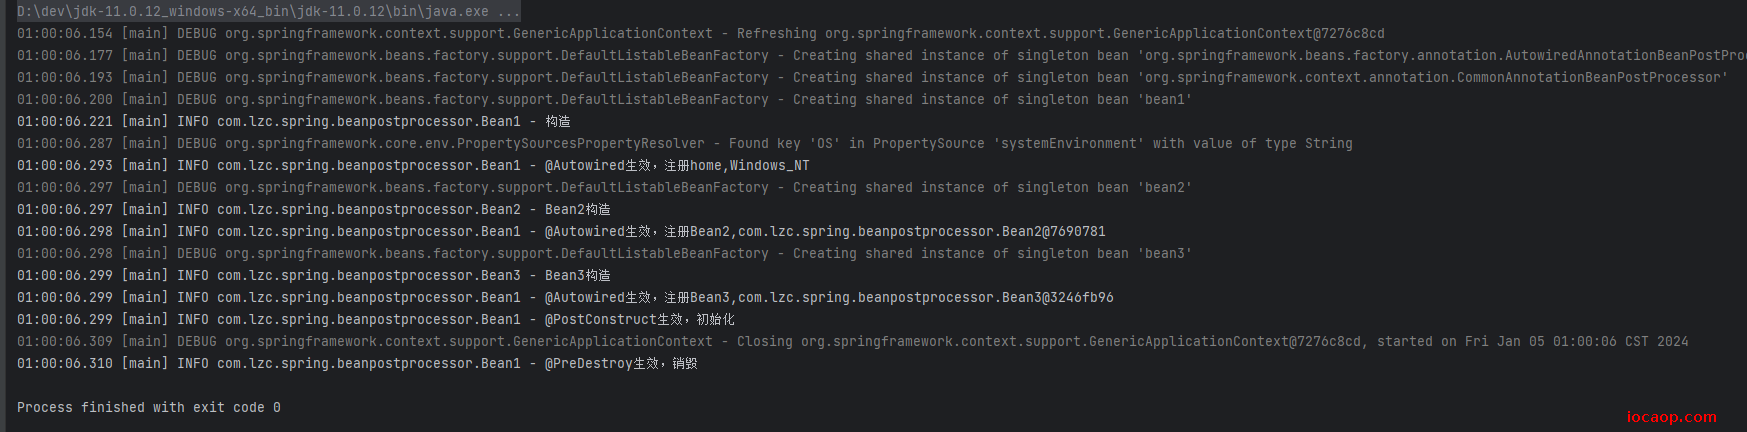
启动后发现,只执行了构造,依赖注入,初始化后,销毁前等方法都没有执行:

因为这是一个干净的ApplicationContext容器,没有任何的Bean后置处理器,所以没有这些功能,现在为容器添加上AutowiredAnnotationBeanPostProcessor的Bean的后置处理器:
这些Bean的后置处理器也是以Bean的形式存在容器的:
context.registerBean(AutowiredAnnotationBeanPostProcessor.class);
添加后执行出现报错:
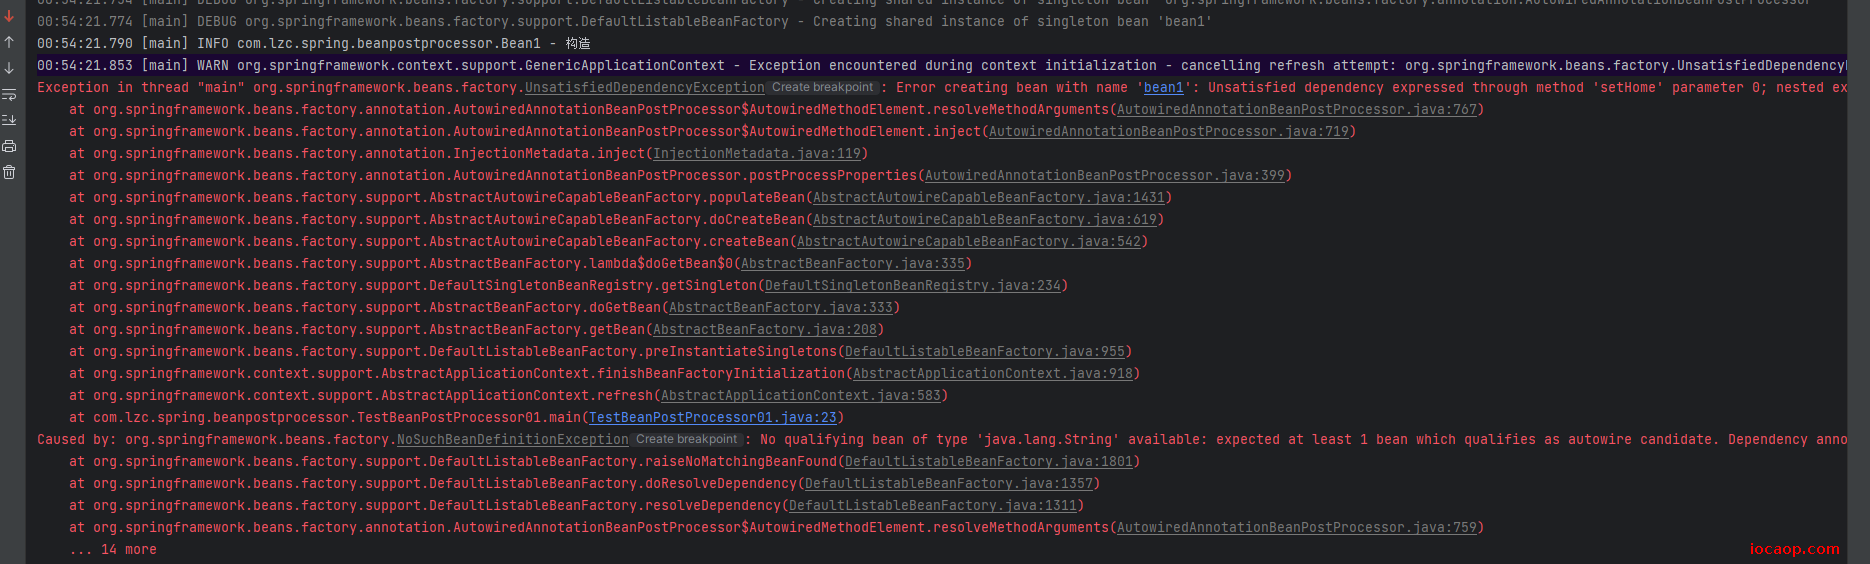
需要替换默认的自动装配候选者解析器,后续会细讲:
context.getDefaultListableBeanFactory().setAutowireCandidateResolver(new ContextAnnotationAutowireCandidateResolver());
这样就可以看到现在拥有了依赖注入的功能,@Autowired起作用了

再加上CommonAnnotationBeanPostProcessor
context.registerBean(CommonAnnotationBeanPostProcessor.class);
@PostConstruct,@PreDestroy等注解也起作用了,包括@Resource,这里没写。
这里学习了
@Autowired比较少见的用法,配合@Value注入环境变量。
@Autowired如果写在方法上,则认为是从容器中装配方法参数类型的Bean,如果参数类型是String,则需要配合@Value进行装配,否则没用。
再创建Bean4:
@ConfigurationProperties(prefix = "java")
@Data
public class Bean4 {

    /**
     * 名称
     */
    private String home;

    /**
     * 年龄
     */
    private String version;
}
直接获取Bean,打印
        Bean4 bean4 = context.getBean(Bean4.class);
        System.out.println("bean4 = " + bean4);

加上相应的Bean后置处理器:
        ConfigurationPropertiesBindingPostProcessor.register(context.getDefaultListableBeanFactory());

        // 初始化Spring容器 执行BeanFactoryPostProcessor BeanPostProcessor 初始化单例bean
        context.refresh();

        Bean4 bean4 = context.getBean(Bean4.class);
        System.out.println("bean4 = " + bean4);

此处读取的是环境变量中的值,不是application.yml中的值