java基础-IO流
10-1-File
01-File和IO概述
之前存储数据都是存在内存里,不能持久化存储,程序停止数据就消失。怎么解决?
数据写入硬盘就可以持久化。
对硬盘进行操作,无非是读写文件。读写文件是否需要一些前提条件?
最起码得知道这个文件在哪。
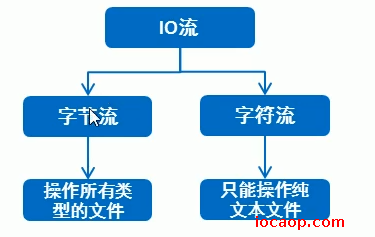
IO可以对硬盘中的文件进行读写,File表示要读写的文件在哪,也可以创建、删除文件。
IO流是什么?
- 可以将数据从本地文件中读取出来
- 可将数据从内存保存到本地文件
File类是什么?
- 在读写数据时告诉虚拟机要操作的(文件、文件夹)在哪
- 对(文件/文件夹)本身进行操作。包括创建、删除。
02-FIle的构造方法
File:是文件和目录路径名的抽象表示
- 文件和目录可以通过File封装成对象
FIle封装的对象仅仅是一个路径名,可以是存在的,也可以是不存在的。
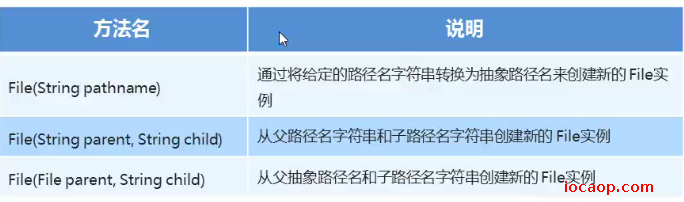
构造方法:
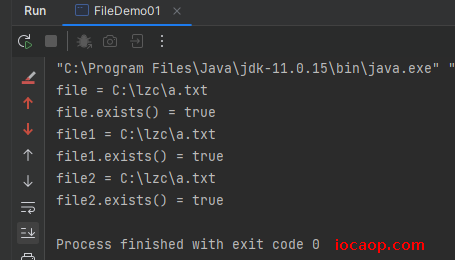
public class FileDemo01 {
    public static void main(String[] args) {

        // 为什么要使用File对象?为了使用里面的方法。单纯的String,无法判断文件是否存在、对文件进行创建、删除。

        // 创建方式1
        String path = "C:\\lzc\\a.txt";
        File file = new File(path);
        System.out.println("file = " + file);
        System.out.println("file.exists() = " + file.exists());

        // 创建方式2  两个路径拼接
        String parentPath = "C:\\lzc";
        String subPath = "a.txt";
        File file1 = new File(parentPath, subPath);
        System.out.println("file1 = " + file1);
        System.out.println("file1.exists() = " + file1.exists());

        // 创建方式3 File对象和String拼接
        File parentFile = new File(parentPath);
        File file2 = new File(parentFile, subPath);
        System.out.println("file2 = " + file2);
        System.out.println("file2.exists() = " + file2.exists());

    }
}
03-绝对路径和相对路径
绝对路径:从盘符开始。如:
       	// 这个路径固定不变了
		File file = new File("C:\\lzc\\a.txt");
相对路径:相对当前项目下的路径
        File file = new File("a.txt");
      	File file = new File("模块名\\a.txt");
04-File的创建功能
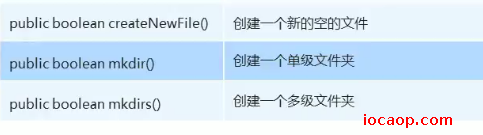
createNewFile方法
- 不管调用者路径是否有后缀名,创建的都是文件,不是文件夹。
- 文件已存在,返回false表示创建失败,文件不存在,创建成功,返回true
public class FileDemo02 {
public static void main(String[] args) throws IOException {
File file = new File("C:\\lzc\\a.txt");
boolean newFile = file.createNewFile();
// 文件已存在,返回false表示创建失败,文件不存在,创建成功,返回true
System.out.println("newFile = " + newFile);
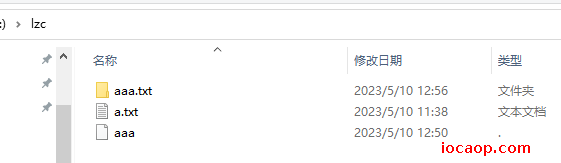
File aFile = new File("C:\\lzc\\aaa");
boolean aNewFile = aFile.createNewFile();
System.out.println("aNewFile = " + aNewFile);
}
}

mkdir方法:
- 只能创建单级文件夹,不能创建多级文件夹
- 不管调用者有没有后缀名,只能创建单级文件夹
public class FileDemo02 {
    public static void main(String[] args) throws IOException {

        File dirFile = new File("C:\\lzc\\aaa\\bbb\\ccc");
        boolean mkdir = dirFile.mkdir();
        System.out.println("mkdir = " + mkdir);
    }
}
返回了false且文件夹没有创建成功。
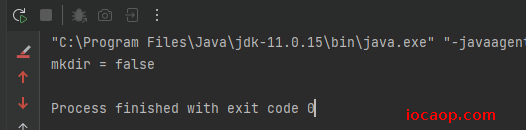
public class FileDemo02 {
    public static void main(String[] args) throws IOException {

        File dirFile = new File("C:\\lzc\\aaa.txt");
        boolean mkdir = dirFile.mkdir();
        System.out.println("mkdir = " + mkdir);
    }
}
创建成功,但是是文件夹,不是文件:
mkdirs方法:
- 可以创建单级文件夹,也可以创建多级文件夹
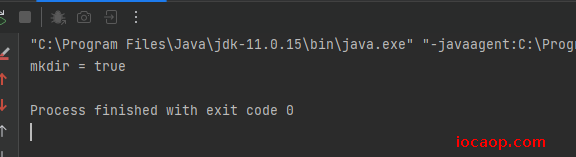
public class FileDemo02 {
    public static void main(String[] args) throws IOException {

        File dirFile = new File("C:\\lzc\\aaa\\bbb\\ccc\\ddd");
        boolean mkdirs = dirFile.mkdirs();
        System.out.println("mkdir = " + mkdirs);
    }
}
返回了true,且文件夹也创建了:

既然mkdirs可以创建单级文件夹,也可以创建多级文件夹,那mkdir有什么用?确实没用,开发中,mkdirs一把梭就行了。
05-File的删除方法

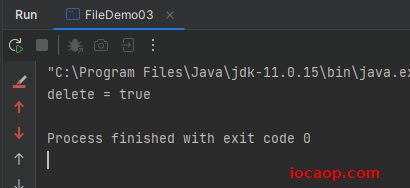
public class FileDemo03 {
    public static void main(String[] args) {
        File file = new File("C:\\lzc\\a.txt");
        boolean delete = file.delete();
        System.out.println("delete = " + delete);
    }
}
删除成功了。并返回了true
public class FileDemo03 {
    public static void main(String[] args) {
        File file = new File("C:\\lzc");
        boolean delete = file.delete();
        System.out.println("delete = " + delete);
    }
}
当文件夹中有文件时,返回false,删除失败。当文件夹是空文件夹时,返回true,删除成功。
注意事项:
- 删除文件后,不会放到回收站,而是直接从硬盘删除。
- 只能删除文件和空文件夹,如果文件夹中还有文件,会删除失败并返回false。
- 如果要删除带文件的文件夹,则必须将文件夹中的文件先删除。
06-File的获取和判断方法
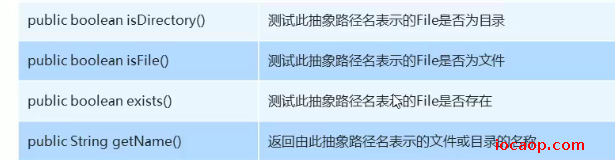
getName方法:
- 调用者是文件,获取的是文件名和后缀名
- 调用者是文件夹,获取的是文件夹名。
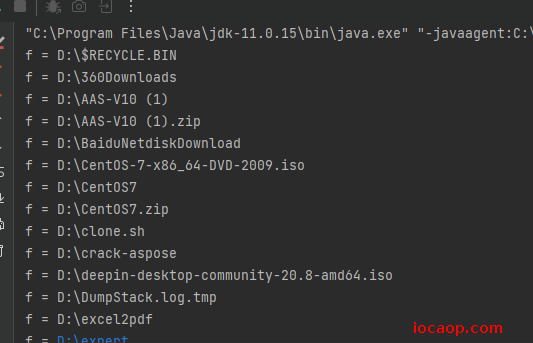
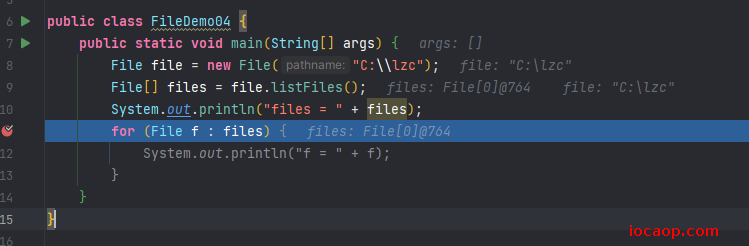
07-File的listFile方法

- 进入file对象所在的文件夹,并获取该文件夹中的所有文件和文件夹,放在File数组中,包括隐藏文件和文件夹。
public class FileDemo04 {
    public static void main(String[] args) {
        File file = new File("D:\\");
        File[] files = file.listFiles();
        for (File f : files) {
            System.out.println("f = " + f);
        }
    }
}
注意事项:
当调用者是一个文件时,会返回null
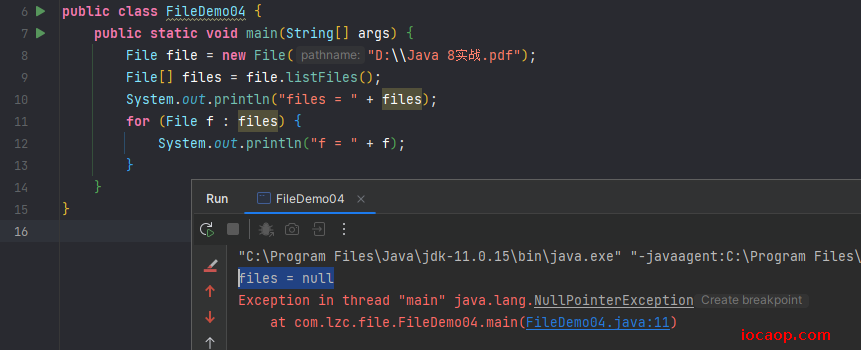
当调用者是一个空文件夹时,返回空数组
当调用者是一个有内容的文件夹时,上面已经试过了。
当调用者是一个有权限才能进入的文件夹时,没有权限则返回null。
08-File练习-文件夹不存在时创建文件
在当前模块下的aaa文件夹下创建一个a.txt文件。
public class FileDemo05 {

    public static void main(String[] args) throws IOException {
        File file = new File("java-workspace\\aaa\\a.txt");
        file.createNewFile();
    }
}
运行报错:
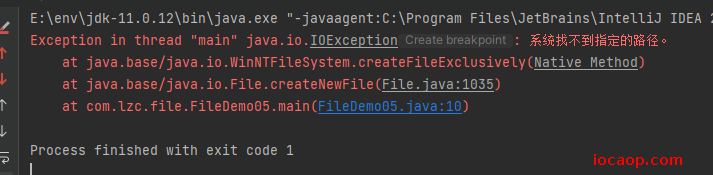
注意:使用
createNewFile()方法,所要创建的文件夹所在的目录必须要存在,否则就会报上面这个错。
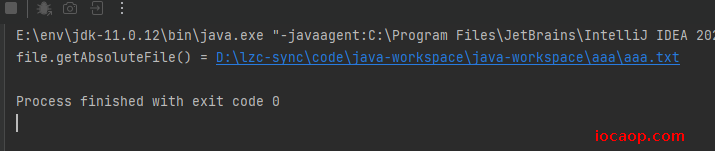
修改后:
public class FileDemo05 {

    public static void main(String[] args) throws IOException {
        File dir = new File("java-workspace\\aaa");
        if (!dir.exists()){
            dir.mkdirs();
        }
        File file = new File(dir, "aaa.txt");
        file.createNewFile();
        System.out.println("file.getAbsoluteFile() = " + file.getAbsoluteFile());
    }
}
09-File练习-删除一个多级文件夹
现在桌面有一个文件夹,里面包含多级文件夹和文件,需要完全删除这个文件夹。
能不能直接调用delete()方法进行删除?
我们在第6节课中已经学过了,删不了,必须把文件夹中的文件删除完毕,才能删除文件夹。
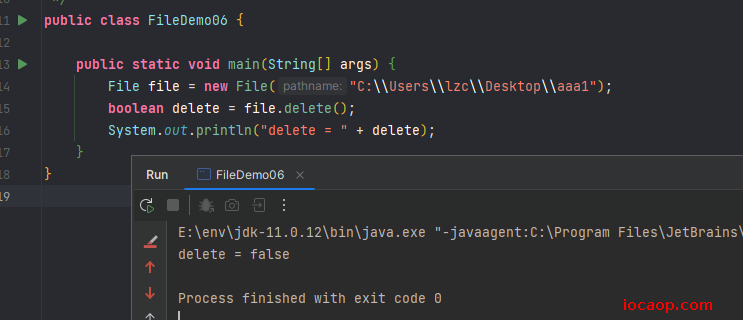
所以,需要遍历整个文件夹,把文件删除,再删除文件夹,文件夹中套娃,怎么办?递归。
public class FileDemo06 {

    public static void main(String[] args) {
        File file = new File("C:\\Users\\lzc\\Desktop\\aaa1");
        System.out.println("deleteDir(file) = " + deleteDir(file));
    }


    public static boolean deleteDir(File file){
        if (Objects.isNull(file)||!file.exists()){
            return false;
        }
        // 判断是文件还是文件夹,是文件则直接删除,是文件夹则递归
        if (!file.isFile()) {
            // 如果是文件夹,则遍历
            File[] files = file.listFiles();
            for (File f : files) {
                if (!f.isFile()){
                    deleteDir(f);
                }else {
                    f.delete();
                }
            }
        }
        // 递归删除完文件夹中的文件后,再删除文件夹
        return file.delete();
    }
}
10-File练习-统计文件夹下文件类型及其个数
使用map存储。
public class FileDemo07 {
    private  static Map<String, Integer> map = new HashMap<>();
    public static void main(String[] args) {
        File file = new File("D:\\study\\hello-world");
        statistical(file);
        System.out.println(map);
    }
    public static void statistical( File file){
        if (Objects.isNull(file)||!file.exists()){
            return;
        }
        if (file.isFile()){
            // 是文件则直接改变map中的值
            calc(file);
        }else if (file.isDirectory()){
            // 文件夹则遍历文件夹
            File[] files = file.listFiles();
            for (File f : files) {

                if (f.isFile()){
                    // 子文件夹中如果遍历到文件,直接改变map中的值
                    calc(f);
                }else {
                    // 子文件夹遍历到文件夹则递归
                    statistical(f);
                }
            }
        }
    }
    private static void calc(File file) {
        String fileName = file.getName();
        String ext = fileName.substring(fileName.lastIndexOf("." )+1);
        if (map.containsKey(ext)){
            Integer num = map.get(ext);
            map.replace(ext,++num);
        }else {
            map.put(ext,1);
        }
    }
}

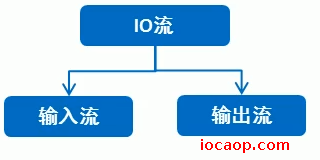
10-2-字节流
12-IO概述
之前数据的存储都是在内存中,不能持久化。
学习IO流的目的:
- 将数据写入到文件中,实现数据持久化存储。
- 读取文件中已经存在的数据。
IO流中:
- I表示
Input,是从数据从硬盘进内存的过程,称之为读。 - O表示
output,是数据从内存到硬盘的过程,称之为写。
在数据传输的过程中,是谁在读?谁在写?这个参照物是谁?
IO的数据传输,可以看做是一种数据的流动,按照流动的方向,以内存为参照物,进行读写。
所以是:内存在读,内存在写。
13-IO流的分类
- 按流向分
- 按数据类型分
什么是纯文本文件?
用windows记事本能打开读懂的,就是纯文本文件。
14-字节流-字节输出流
步骤:
- 创建字节输出流对象
- 写数据
- 释放资源
public class OutPutDemo01 {
    public static void main(String[] args) {

        // 创建字节输出流
        try {
            FileOutputStream outputStream = new FileOutputStream("D:\\a.txt");
            outputStream.write(97);
            outputStream.close();
        } catch (FileNotFoundException e) {
            throw new RuntimeException(e);
        } catch (IOException e) {
            throw new RuntimeException(e);
        }

    }
}
运行结果:
15-字节流-注意事项
如果文件不存在,会自动创建。
如果文件存在,会把文件清空。
写数据时,如果传入的是整数,实际写入的是这个整数在ASCII对应的字符。
释放资源:告诉操作系统,程序不需要再使用这个文件了。否则其他程序无法操作文件(如,删除),所以每次使用完流,必须要释放资源。
16-字节流-一次写入多个数据
public class OutPutDemo02 {
    public static void main(String[] args) {

        // 创建字节输出流
        try {
            FileOutputStream outputStream = new FileOutputStream("D:\\a.txt");
            outputStream.write(97);
            outputStream.write(98);
            outputStream.write(99);
            outputStream.close();
        } catch (FileNotFoundException e) {
            throw new RuntimeException(e);
        } catch (IOException e) {
            throw new RuntimeException(e);
        }

    }
}
这样的方式可以实现,但是数据很多,怎么办?看write()方法的重载:

public class OutPutDemo03 {
    public static void main(String[] args) {
        FileOutputStream outputStream = null;
        try {
            outputStream= new FileOutputStream("D:\\a.txt");
            byte[] byteArray =  new byte[]{97,98,99,100,101,102};
            outputStream.write(byteArray);

        } catch (FileNotFoundException e) {
            throw new RuntimeException(e);
        } catch (IOException e) {
            throw new RuntimeException(e);
        }finally {
            try {
                outputStream.close();
            } catch (IOException e) {
                throw new RuntimeException(e);
            }
        }
    }
}
运行结果:
17-字节流-两个问题
在使用字节流写入数据的时候,如何换行?
换行符:
- windows:\r\n
- linux:\n
- mac:\r
使用String类中的getBytes()方法获取字节数组。
public class OutPutDemo02 {
    public static void main(String[] args) {

        // 创建字节输出流
        try {
            FileOutputStream outputStream = new FileOutputStream("D:\\a.txt");
            outputStream.write(97);
            outputStream.write("\r\n".getBytes());
            outputStream.write(98);
            outputStream.write("\r\n".getBytes());
            outputStream.write(99);
            outputStream.close();
        } catch (FileNotFoundException e) {
            throw new RuntimeException(e);
        } catch (IOException e) {
            throw new RuntimeException(e);
        }

    }
}
运行结果:
字节流写数据如何实现追加写入?
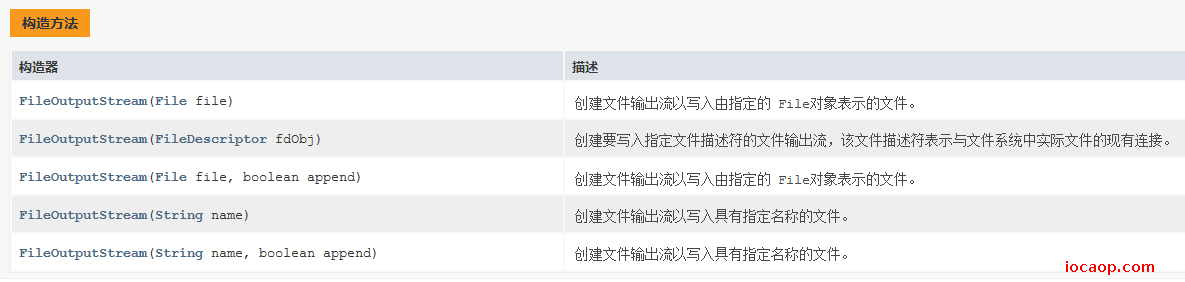
看FileOutputStream的构造:

默认是false,如果需要追加写入,就可以传入true。在创建
FileOutPutStream对象时,如果没有打开续写,则创建对象时会清空文件。
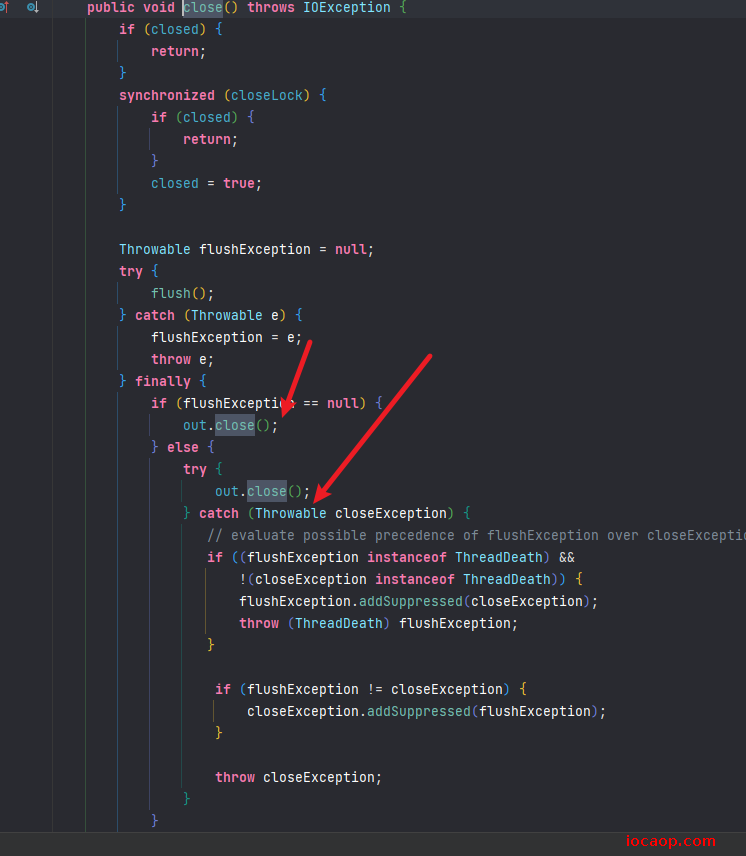
18-字节流-try...catch...finally
在finally中释放资源,保证释放资源的代码一定执行。
20-字节流-字节输入流

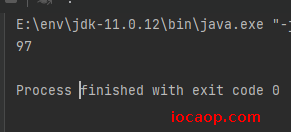
public class InputDemo01 {
    public static void main(String[] args) {
        try {
            FileInputStream fileInputStream = new FileInputStream("D:\\a.txt");
            int read = fileInputStream.read();
            System.out.println(read);
        } catch (FileNotFoundException e) {
            throw new RuntimeException(e);
        } catch (IOException e) {
            throw new RuntimeException(e);
        }
    }
}

运行结果:
注意事项:
创建字节输入流时,如果文件存在不会报错,如果文件不存在,则直接报错。
read()方法一次读一个字节,返回值是本次读到的那个字节数据,是字符在ASCII码表中对应的数字。如果想看到的是char数据,则需要强转。
21-字节流-读多个字节
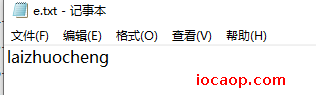
上面的方法,只能读一个字节,如果我想读多个字节的数据,怎么办?
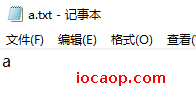
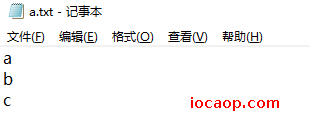
首先我们有这样的一个txt文件:
最容易想到的思路就是循环读:
public class InputDemo02 {
    public static void main(String[] args) {
        try {
            FileInputStream fileInputStream = new FileInputStream("D:\\a.txt");
            while (true){
                int read = fileInputStream.read();
                System.out.print((char)read);
            }
        } catch (FileNotFoundException e) {
            throw new RuntimeException(e);
        } catch (IOException e) {
            throw new RuntimeException(e);
        }
    }
}
运行结果:

查阅api可知,当没有读到数据时,read方法返回的是-1,所以,修改循环跳出的条件:
public class InputDemo02 {
    public static void main(String[] args) {
        FileInputStream fileInputStream = null;
        try {
            fileInputStream = new FileInputStream("D:\\a.txt");
            int read;
            while ((read=fileInputStream.read())!=-1){
                System.out.print((char)read);
            }
        } catch (FileNotFoundException e) {
            throw new RuntimeException(e);
        } catch (IOException e) {
            throw new RuntimeException(e);
        }finally {
            try {
                fileInputStream.close();
            } catch (IOException e) {
                throw new RuntimeException(e);
            }
        }
    }
}
运行结果:
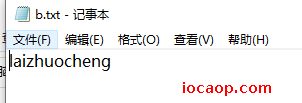
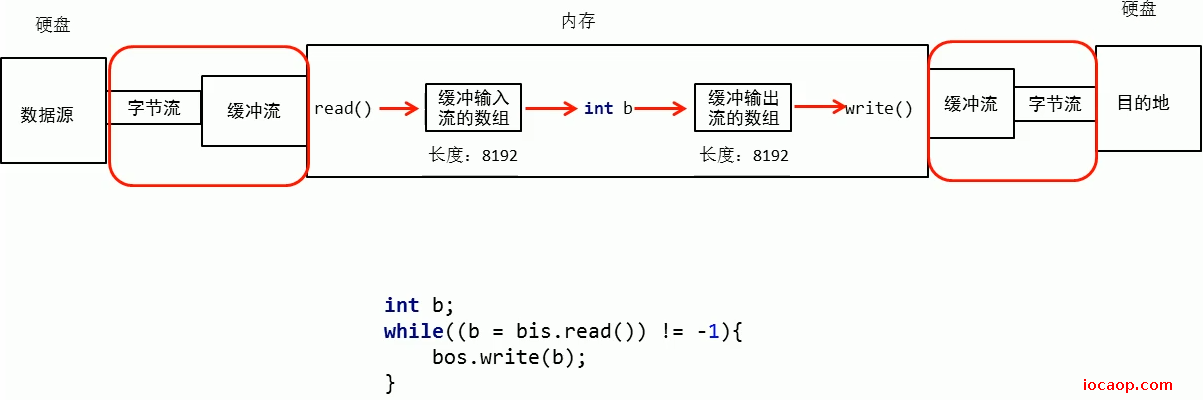
22-字节流-复制文件
拷贝D盘下的a.txt,新文件b.txt
public class InputDemo03 {
    public static void main(String[] args) throws IOException {
        // 创建字节输入流,文件存在不报错
        FileInputStream fileInputStream = new FileInputStream("D:\\a.txt");
        // 创建字节输出流,文件存在不做操作,文件不存在则会自动创建
        FileOutputStream outputStream = new FileOutputStream("D:\\b.txt");

        // 定义一个遍历,一次读一个字节,存在这个变量中
        int b;
        // 读到一个字节的数据则通过输出流往b.txt写一个字节
        while((b=fileInputStream.read())!=-1){
            outputStream.write(b);
        }
        // 关闭资源
        fileInputStream.close();
        outputStream.close();
    }
}
运行结果:
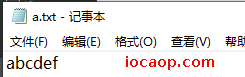
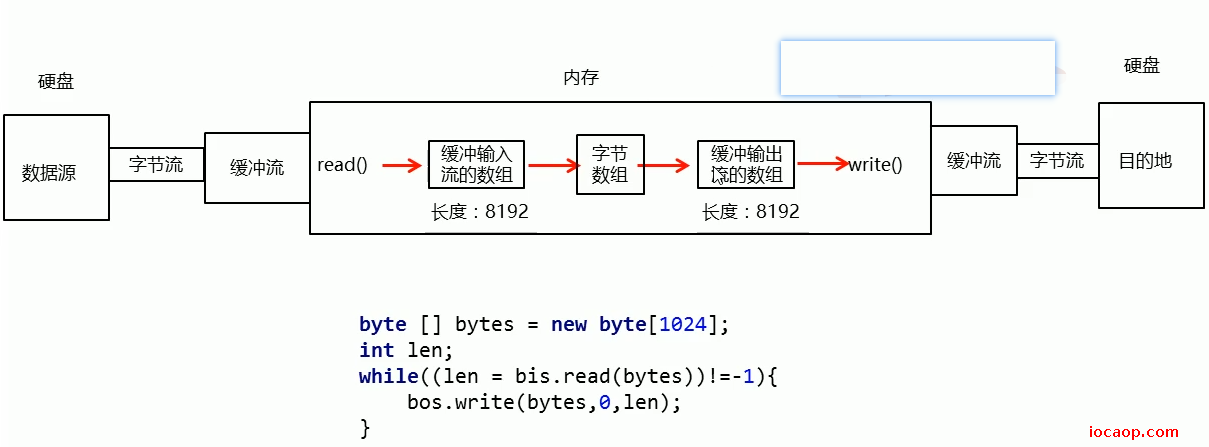
23-字节流-定义小数组拷贝
22节课中,循环读取如图所示,会不会存在什么问题?

答:慢。每读一个字节,然后写到硬盘,如果有几千、几万字节,那就非常慢。
为了提高拷贝速度,字节流通过创建字节数组,可以一次读写多个数据。
一次读一个字节数组的方法:

返回值是读入缓冲区的总字节数,也就是实际的读取字节个数。
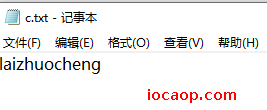
同样,拷贝a.txt到c.txt
public class InputDemo04 {
    public static void main(String[] args) throws IOException {
        // 输入流和输出流
        FileInputStream is = new FileInputStream("D:\\a.txt");
        FileOutputStream os = new FileOutputStream("D:\\c.txt");

        // 定义小数组 表示每次最多读1024个字节
        byte[] bytes = new byte[1024];
        // 定义变量用于记录每次实际读了多少个字节
        int len;
        while((len = is.read(bytes))!=-1){
            // 表示从索引0开始写入文件,写入的字节数为len个  这就是len的作用
            os.write(bytes,0,len);
        }

        is.close();
        os.close();
    }
}
运行结果:
24-字节流-小数组拷贝原理

10-3-缓冲流
25-缓冲流-一次读写一个字节
字节缓冲流分为两种:
- BufferedOutputStream:字节缓冲输出流
- BufferedInputStream:字节缓冲输入流
构造函数:

可以看到,构造函数需要的是字节流,而不是具体的文件或者路径。为什么?
- 字节缓冲流仅仅提供缓冲区,而真正读写数据还是得依靠基本的字节流对象进行操作。
/**
* 缓冲流复制文件演示
*
* @author lzc
* @date 2023/06/02
*/
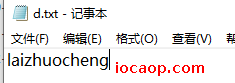
public class BufferStreamCopyDemo {
public static void main(String[] args) throws IOException {
// 创建一个字节缓冲输入流
BufferedInputStream bis = new BufferedInputStream(new FileInputStream("D:\\a.txt"));
// 创建一个字节缓冲输出流
BufferedOutputStream bos = new BufferedOutputStream(new FileOutputStream("D:\\d.txt"));
int read;
// 一个一个字节的读
while((read = bis.read())!=-1){
bos.write(read);
}
// 这里只需要关闭缓冲流,缓冲流关闭,字节输入流和输出流也会跟着关闭
bis.close();
bos.close();
}
}
运行结果:
26-缓冲流-一次读写一个字节原理
看字节缓冲输入流和字节缓冲输出流的构造函数:
字节缓冲输入流:
    public BufferedInputStream(InputStream in) {
        this(in, DEFAULT_BUFFER_SIZE);
    }
    public BufferedInputStream(InputStream in, int size) {
        super(in);
        if (size <= 0) {
            throw new IllegalArgumentException("Buffer size <= 0");
        }
        buf = new byte[size];
    }
private static int DEFAULT_BUFFER_SIZE = 8192;
字节缓冲输出流:
    public BufferedOutputStream(OutputStream out) {
        this(out, 8192);
    }
    public BufferedOutputStream(OutputStream out, int size) {
        super(out);
        if (size <= 0) {
            throw new IllegalArgumentException("Buffer size <= 0");
        }
        buf = new byte[size];
    }
发下,在创建字节缓冲输入流和字节缓冲输出流的时候,都会在底层创建一个长度为8192的字节数组。
当读写输入时,会一次性读写8192个字节(如果有这么多的话,没有则全部读)到缓冲流中(内存中)
再看关闭方法:
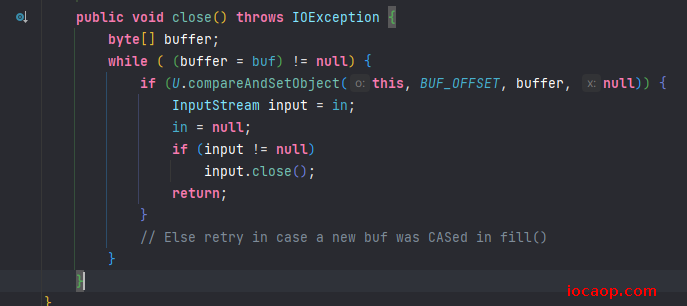
只需要知道,关闭字节缓冲输入流或字节缓冲输出流的时候,会关闭字节输入流和字节输出流就可以了,不需要我们手动去关闭了。
我们写的代码也是一个字节一个字节从缓冲输入流读(到内存),再一个字节一个字节从缓冲输出流写(到缓冲输出流),有什么意义呢?意义在于红框部分,缓冲流其实就是把数据缓冲到内存中,然后一个个字节读写,其实是在内存中进行的,所以缓冲流的作用是减少io次数,提高效率。默认一次性读写8191个字节。
27-缓冲流-一次性读写一个字节数组
缓冲流结合字节数组进行文件拷贝。
public class BufferStreamCopyDemo02 {

    public static void main(String[] args) throws IOException {
        // 创建字节缓冲输入流
        BufferedInputStream bis = new BufferedInputStream(new FileInputStream("D:\\a.txt"));
        // 创建字节缓冲输出流
        BufferedOutputStream bos = new BufferedOutputStream(new FileOutputStream("D:\\e.txt"));

        // 创建一个长度为1024大小的字节数组
        byte[] bytes = new byte[1024];
        int len = 0;
        // 每次通过字节输入流从硬盘读8192个字节到字节缓冲输入流中,再从字节缓冲输入流读1024个字节到内存  硬盘->字节输入流->字节缓冲输入流—>内存
        // 每次从内存写1024个字节到字节缓冲输出流,再通过字节输出流,从字节缓冲输出流写8192个字节到磁盘  内存->字节缓冲输出流->字节输出流->磁盘

        while((len = bis.read(bytes))!=-1){
            bos.write(bytes,0,len);
        }

        bis.close();
        bos.close();
    }
}
运行结果:
    private static void copy2() {
        try(BufferedInputStream bis = new BufferedInputStream(new FileInputStream("E:\\sort.txt"));
            BufferedOutputStream fos = new BufferedOutputStream(new FileOutputStream("E:\\sort_copy.txt"))){
            byte[] bytes = new byte[8192];
            int len = 0;
            while ((len = bis.read(bytes))!=-1){
                fos.write(bytes,0,len);
            }
        }catch (Exception e){
            throw new RuntimeException("111111111111");
        }
    }

    private static void copy1() {
        try(FileInputStream fis = new FileInputStream("E:\\sort.txt");
            FileOutputStream fos = new FileOutputStream("E:\\sort_copy.txt")){

            byte[] bytes = new byte[8192];
            int len = 0;
            while ((len = fis.read(bytes))!=-1){
                fos.write(bytes,0,len);
            }
        }catch (Exception e){
            throw new RuntimeException("111111111111");
        }
    }
这种情况,
copy1和copy2,copy1的效率要高,因为缓冲流内置一个8192大小的数组,需要多倒手一次。如果没有自定义数组或是字符流,那肯定用缓冲流好,缓冲流效率高,且字符缓冲流有特有的方法。
10-4 字符流、字符缓冲流
01-字节流操作文本文件出现乱码问题
思考:既然字节流可以操作所有类型的文件,为什么还要有字符流?
如果利用字节流读写中文,有可能出现乱码。
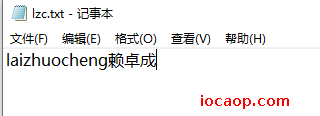
public class CharStreamDemo01 {
    public static void main(String[] args) throws IOException {
        FileInputStream fileInputStream = new FileInputStream("D:\\lzc.txt");

        int read;
        while((read = fileInputStream.read())!=-1){
            System.out.print((char) read);
        }
    }
}
运行结果:

02-字符流-编码表
基础知识:
- 计算机存储信息用二进制
- 按某种规则把字符转二进制,存储到计算机,是编码
- 同样的规则,从计算机读二进制再解析显示出字符,是解码
- 编码解码方式必须一致,否则乱码
存储a,ASCII为97,转为97的二进制存到硬盘,读到97的二进制,转成97,查ASCII,找到字符a。
window系统默认GBK,兼容ASCII,一个中文两个字节。
Unicode:万国码,容纳大多数国家的所有常见文字和符号,字符太多,所以Unicode不是直接二进制存在计算机,会先通过UTF-8(还有其他的)进行编码,再存储到计算机。UTF-8一个中文三个字节。
世界上并不存在UTF-8这样一张码表,UTF-8是一种编码格式。
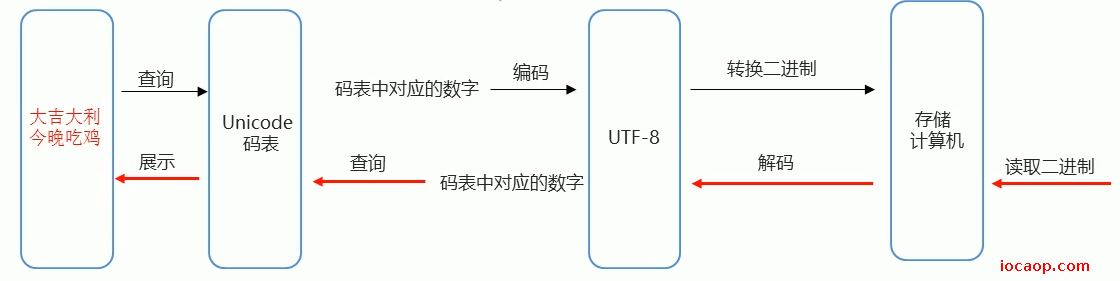
window默认使用GBK,一个字符两个字节,idea和工作默认使用Unicode的UTF-8编码格式,一个中文三个字节。
03-字符流-编码和解码的方法
编码使用的方法:String类的成员方法

public class CharStreamDemo02 {
public static void main(String[] args) throws UnsupportedEncodingException {
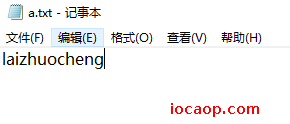
byte[] bytesUTF8 = "赖卓成".getBytes();
System.out.println(Arrays.toString(bytesUTF8));
byte[] bytesGBK = "赖卓成".getBytes("GBK");
System.out.println(Arrays.toString(bytesGBK));
}
}
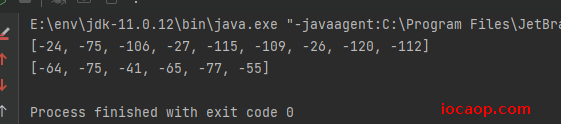
解码使用的方法:
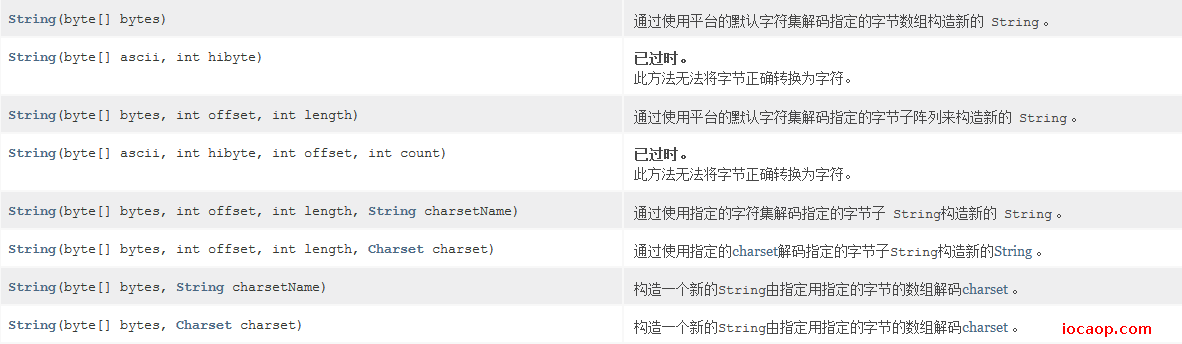
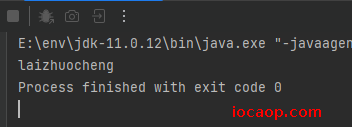
public class CharStreamDemo03 {
    public static void main(String[] args) throws UnsupportedEncodingException {
       byte[] bytesUTF8 =  new byte[]{-24, -75, -106, -27, -115, -109, -26, -120, -112};
        String utf8Str = new String(bytesUTF8);
        System.out.println(utf8Str);

        byte[] bytesGBK =  new byte[]{-64, -75, -41, -65, -77, -55};
        String gbkStr = new String(bytesGBK, "GBK");
        System.out.println(gbkStr);
    }
}
04-字节流读取中文出现乱码的原因
因为字节流每次只读一个字节,不管是GBK还是UTF-8,一个中文都是多个字节,用字节流,没读全,所以乱码。
如GBK的赖为:{-64, -75},字节流读取,每次读一个,-64和-75都是乱码。
05-字符流读取中文的过程
- 字符流=字节流+编码表
基础知识:
不管在哪张码表中,中文的第一个字节一定是负数。
举例:
当使用字符流读取a赖卓成的时候,字节数组是:[97, -64, -75, -41, -65, -77, -55]
先读取第一个97,没问题,对应字母a,当读取到-64的时候,这时候知道,这是中文,所以看现在用的码表,是GBK,知道了一个中文对应两个字节,所以根据GBK码表得出[-64,-75]为赖,后面的类推。
小结:
- 如果想要进行拷贝,一律使用字节流或者字节缓冲流。
- 如果读写文本中的数据,一律使用字符流。
GBK是windows系统默认的码表,一个中文两个字节,Unicode的UTF-8编码格式,一个中文三个字节。
06-字符流-写数据
步骤和字节流类似:
- 创建字符输出流对象
- 写数据
- 释放资源
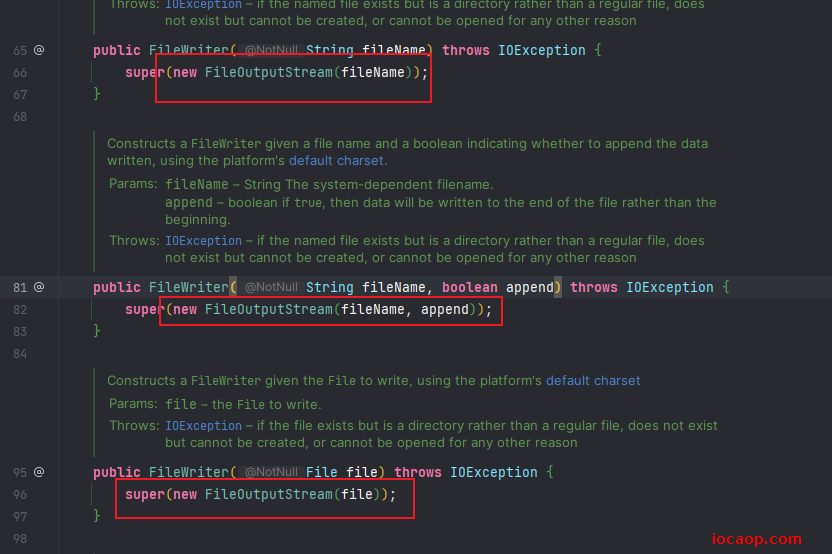
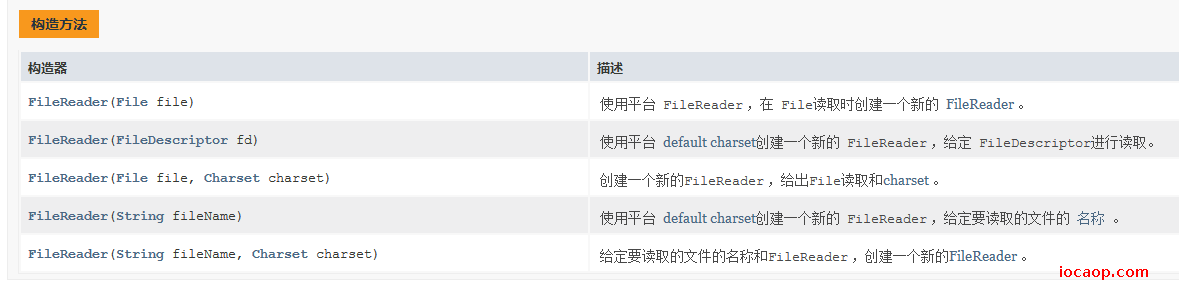
先看API:
简单查看源码就可以看出,其实字符流最终还是使用了字节流,加上编码表,实现字符流。
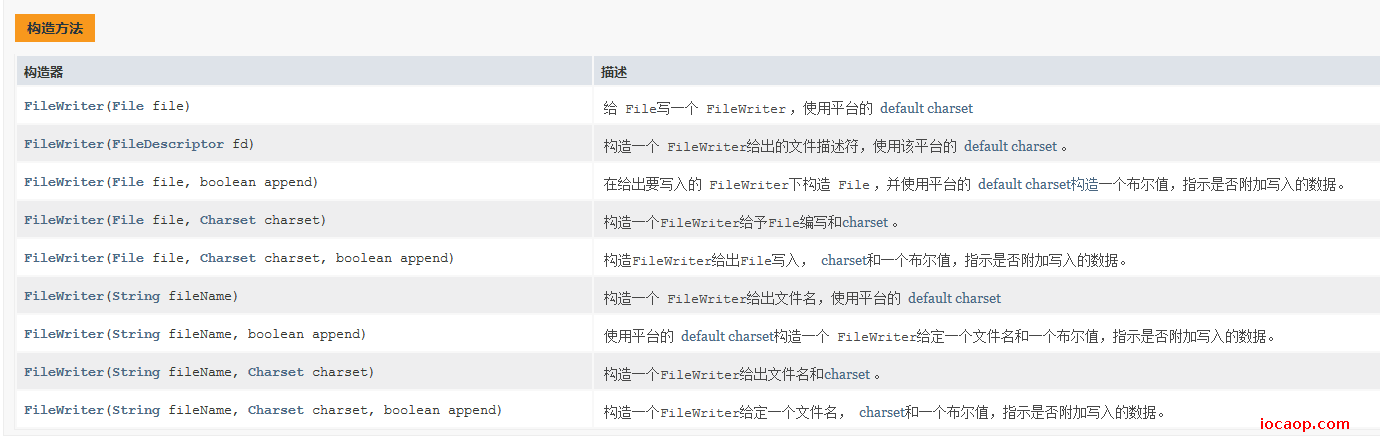
写数据的5中方式,重载:
写代码:
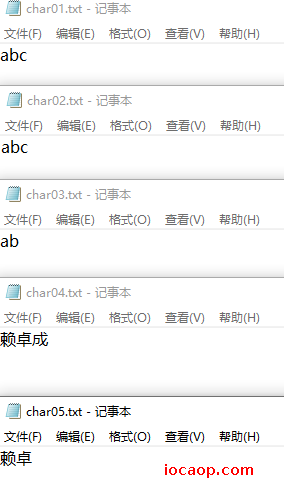
public class CharStreamDemo04 {
public static void main(String[] args) throws IOException {
// 每次写一个字节的方法demo
FileWriter fileWriter01 = new FileWriter("E:\\char01.txt");
fileWriter01.write(97);
fileWriter01.write(98);
fileWriter01.write(99);
fileWriter01.close();
// 一次写出一个字符数组
FileWriter fileWriter02 = new FileWriter("E:\\char02.txt");
fileWriter02.write(new char[]{97,98,99});
fileWriter02.close();
// 一次写出一个字符的一部分
FileWriter fileWriter03 = new FileWriter("E:\\char03.txt");
fileWriter03.write(new char[]{97,98,99},0,2);
fileWriter03.close();
// 一次写一个字符串
FileWriter fileWriter04 = new FileWriter("E:\\char04.txt");
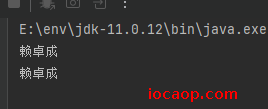
fileWriter04.write("赖卓成");
fileWriter04.close();
// 一次写一个字符串的一部分
FileWriter fileWriter05 = new FileWriter("E:\\char05.txt");
fileWriter05.write("赖卓成",0,2);
fileWriter05.close();
}
}
运行结果:
07-字符流-写出数据的注意事项
- 创建字符输出流时
- 如果文件不存在则创建,但需要保证父级路径存在
- 如果文件存在,则清空
- 写数据时
- 写出
int类似的整数,实际写出的是整数在ASCII码表上对应的字母。 - 写出字符串数据时,是把字符串本身原样写出。
- 写出
插播一个装备小技巧:
    public static void main(String[] args) {
        // 嘻嘻 try-with-resource写法哦
        try(FileWriter fileWriter = new FileWriter("E:\\try.txt")){
            fileWriter.write(91);
        }catch (Exception e){
            throw new RuntimeException("嘻嘻 try-with-resource写法哦");
        }
    }
08-字符流-flush和clode方法

看现象:
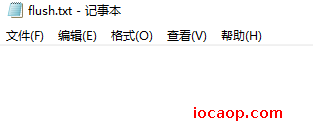
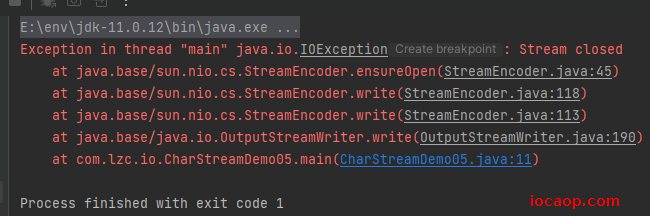
public class CharStreamDemo05 {
    public static void main(String[] args) throws IOException {
        FileWriter fileWriter = new FileWriter("E:\\flush.txt");
        fileWriter.write(97);
    }
}
运行结果:
文件创建了,是在创建字符输出流时创建的,但是打开文件并没有写入字符:
加一行代码运行:
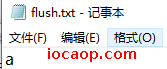
public class CharStreamDemo05 {
    public static void main(String[] args) throws IOException {
        FileWriter fileWriter = new FileWriter("E:\\flush.txt");
        fileWriter.write(97);
        fileWriter.flush();
    }
}
再加两行:
public class CharStreamDemo05 {
    public static void main(String[] args) throws IOException {
        FileWriter fileWriter = new FileWriter("E:\\flush.txt");
        fileWriter.write(97);
        fileWriter.flush();
        fileWriter.write(98);
        fileWriter.flush();
    }
}
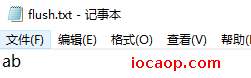
得出:flush()方法是将刷新流,将数据写入文件。
试试clode()方法:
public class CharStreamDemo05 {
    public static void main(String[] args) throws IOException {
        FileWriter fileWriter = new FileWriter("E:\\flush.txt");
        fileWriter.write(97);
        fileWriter.close();
    }
}
这样写,依然可以将数据写入文件,因为在关闭流,会调用flush()方法(底层代码不必纠结,知道就行),将数据写入文件。
但是,关闭流之后就不能继续写数据了,这是close()和flush()方法的区别:
09-字符流-读取数据
先看API:
底层也是字节流+编码表,源码不截图了。
一次读取一个字符,需要注意的是,这里一次读取的是一个字符,不是一个字节:
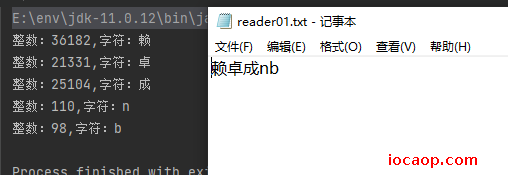
public class CharStreamDemo06 {
    public static void main(String[] args) throws IOException {
        FileReader fileReader = new FileReader("E:\\reader01.txt");
        int i;
        while ((i=fileReader.read())!=-1){
            System.out.println("整数:"+i+",字符:"+(char)i);
        }
    }
}
一次读取多个字符:
public class CharStreamDemo07 {
    public static void main(String[] args) throws IOException {
        FileReader fileReader = new FileReader("E:\\reader01.txt");
        char[] chars = new char[1024];
        int len=0;
        while ((len=fileReader.read(chars))!=-1){
            String s = new String(chars, 0, len);
            System.out.println(s);
        }
    }
}
一次性读取多个字节到字节数组,读到多少个记录在len中,创建String的时候指定范围就好了。一次读取这么多字节在数组中连续存放,怎么区分?上面讲过,根据负数区分,中文一定是负数,碰到负数,再看用什么码表,就知道中文占几个字节,就知道每次转中文需要几个字节了。
10-字符流-练习
输入用户名和密码,保存在文件中,独占一行。
public class CharStreamDemo08 {
    public static void main(String[] args) throws IOException {
        Scanner scanner = new Scanner(System.in);

        System.out.println("请输入用户名:");
        String userName = scanner.nextLine();
        System.out.println("请输入密码:");
        String password = scanner.nextLine();
        FileWriter fileWriter = new FileWriter("E:\\user.txt");
        fileWriter.write(userName);
        fileWriter.write("\r\n");
        fileWriter.write(password);
        fileWriter.close();
    }
}
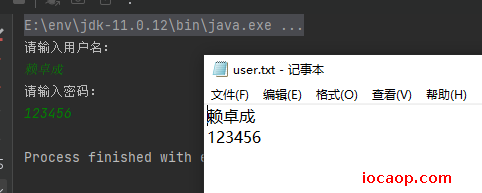
Windows换行是\r\n,Mac是\r,Linux是\n
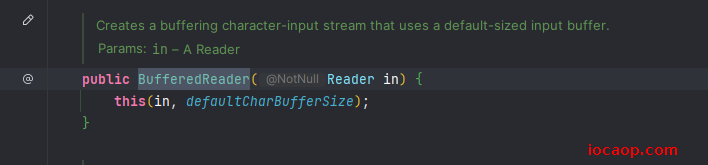
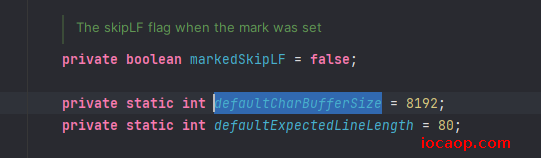
11-字符缓冲输入流-读取数据
作用:提高读取效率。
看API:

代码和之前都类似:
public class CharStreamDemo09 {

    public static void main(String[] args) throws IOException {
        BufferedReader bf = new BufferedReader(new FileReader("E:\\buffedReader01.txt"));
        char [] chars = new char[1024];
        int len;
        while((len=bf.read(chars))!=-1){
            System.out.println(new String(chars,0,len));
        }
    }

}
提高效率的原理也是依次读取8192的字节到缓冲区:
12-字符缓冲输出流-输出数据

和字符输出流写数据一样的用法。
13-字符缓冲流的特有方法
BufferedWriter:
void newLine():写一行 行分隔符,行分隔符字符串 由系统属性定义。不需要我们手动来根据系统写\r\n、\r、\n。
    public static void main(String[] args) throws IOException {
        BufferedWriter bufferedWriter = new BufferedWriter(new FileWriter("E:\\newLine.txt"));
        bufferedWriter.write("赖卓成的笔记");
        bufferedWriter.newLine();
        bufferedWriter.write("哈哈");
        bufferedWriter.newLine();
        bufferedWriter.close();
    }
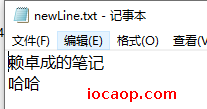
可以理解为跨平台的换行符
BufferedReader:
public String readLine:读一行文字,结果包含行的内容的字符串,不包括任何终止字符,如果流的结尾已经到达,则为null。
public class CharStreamDemo13 {

    public static void main(String[] args) throws IOException {
        BufferedReader bufferedReader = new BufferedReader(new FileReader("E:\\readLine.txt"));
        String line1 = bufferedReader.readLine();
        System.out.println("line1 = " + line1);

        String line2 = bufferedReader.readLine();
        System.out.println("line2 = " + line2);

        String line3 = bufferedReader.readLine();
        System.out.println("line3 = " + line3);

        String line4 = bufferedReader.readLine();
        System.out.println(line4);

    }

}
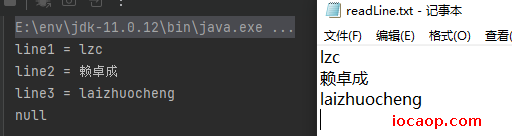
注意:在之前,如果没有读到数据,返回的是-1,而使用
readLine如果没有读到数据则返回null
当我们使用循环进行读取时,就应该这样写:
public class CharStreamDemo14 {

    public static void main(String[] args) throws IOException {
        BufferedReader bufferedReader = new BufferedReader(new FileReader("E:\\readLine.txt"));
        String line;
        while((line=bufferedReader.readLine())!=null){
            System.out.println(line);
        }
    }
}
readLine()读取一整行数据,一直读到回车换行为止,但不会把回车换行读进来。
14-缓冲流
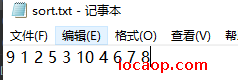
文件里有一行数字,读到内存,排序后写回文件(覆盖原来的文件)。
public class CharStreamDemo15 {

    public static void main(String[] args) throws IOException {
        BufferedReader bufferedReader = new BufferedReader(new FileReader("E:\\sort.txt"));
        // 一次读一行,然后按照空格切割
        String s = bufferedReader.readLine();
        bufferedReader.close();
        if (s==null){
            System.out.println("读到的内容是:null");
        }else {
            // 9 1 2 5 3 10 4 6 7 8
            System.out.println("读到的内容是:"+s);
        }

        String[] split = s.split(" ");
        int[] ints = new int[split.length];
        // 转为int
        for (int i = 0; i < split.length; i++) {
            ints[i] = Integer.parseInt(split[i]);
        }
        Arrays.sort(ints);

        System.out.println("排序后:"+Arrays.toString(ints));
        BufferedWriter bufferedWriter = new BufferedWriter(new FileWriter("E:\\sort.txt"));
        for (int i = 0; i < ints.length; i++) {
            bufferedWriter.write(ints[i]+" ");
        }
        bufferedWriter.close();
    }

}
这里注意一个细节,不能在创建缓冲字符输入流以后马上创建缓冲字符输出流。
因为创建缓冲字符输入流时,如果文件存在,则清空,不存在则创建。
后果:

10-5转换流、对象操作流、Properties
16-转换流的概念
先复习一下字符流读取文件的过程。
- 当没有中文时,也是一个一个字节进行读取,转成
char类型 - 当有中文时,遇到第一个负数,会查表,假设是
UTF-8则会读一次取三个字节,转成一个中文。
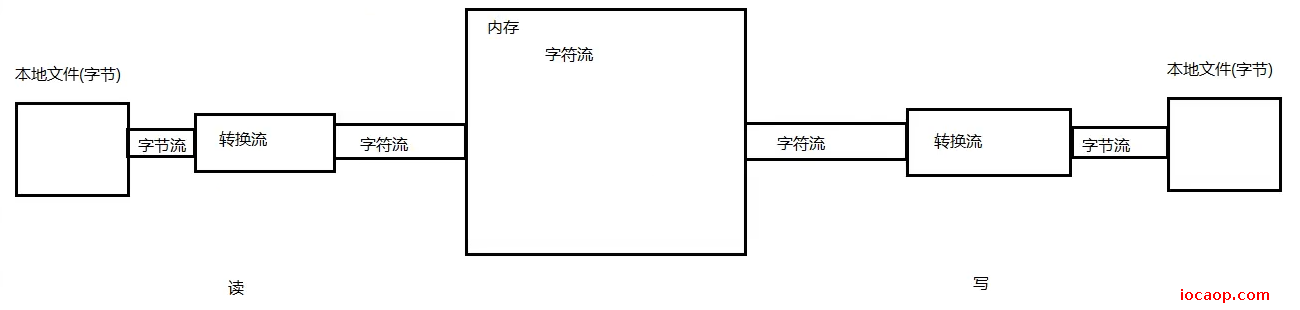
字符流在读取数据的过程中,真正读取数据的其实还是字节流。我们知道原理是这样,但是实际创建的还是字符流,那是谁把字符流变成字节流的呢?是转换流。
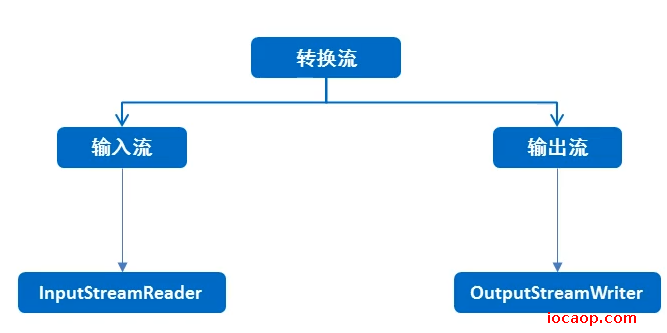
官方API解释:

InputStreamReader是从字节流到字符流的桥接器:它使用指定的charset读取字节并将其解码为字符。

OutputStreamWriter是从字符流到字节流的桥接器:使用指定的charset将写入其中的字符编码为字节。
图解释:
看源码:
当我们创建字符输入流时,调用的构造方法,会创建一个字节输入流,再调用父类构造,将字节流传递给父类,创建转换流,并且,在字符输入流中,没有任何成员方法,全是构造方法,所以我们在使用字符流时,调用的成员方法都是继承自父类的。
小结:转换流就是用来进行字节流和字符流之间转换的。InputStreamReader是从字节流到字符流的桥梁,OutPutStreamReader是字符流到字节流的桥梁。
jdk已经帮我们封装好了转换流,一般我们不需要直接使用转换流,而是使用字节流。
17-转换流-指定编码读写
在jdk11之前,转换流可以用作指定编码读写,jdk11之后,一般不会使用转换流了。
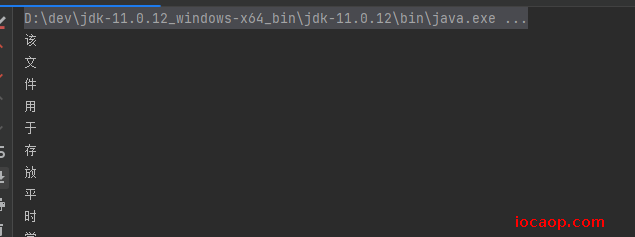
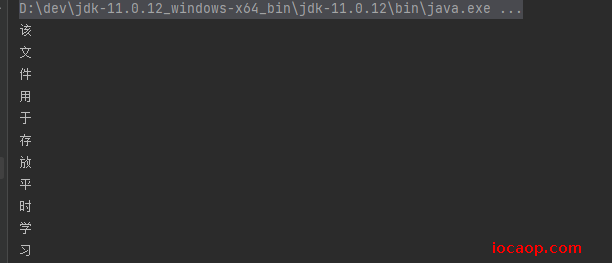
先来个demo:使用字符流逐个读取文本文件的内容,文本文件编码使用ANSI,ANSI表示使用系统默认的编码表。当前是window系统,默认使用GBK,而我当前的idea编码格式为Unicode的UTF-8编码格式。
public class FileReaderDemo01 {
    public static void main(String[] args){
       try( FileReader fileReader = new FileReader("D:\\dev\\workfile\\该文件夹的作用.txt");){
           int charInt=0;
           while((charInt = fileReader.read())!=-1){
               System.out.println((char) charInt);
           }
       }catch (Exception e){
        throw new RuntimeException(e);
       }
    }
}
编码不一致,肯定输出乱码:

如何解决这个问题?那当然是指定文本文件的编码格式啦,如何指定?jdk11以前需要这样:
public class FileReaderDemo02 {

    public static void main(String[] args){
        try(InputStreamReader isr = new InputStreamReader(new FileInputStream("D:\\dev\\workfile\\该文件夹的作用.txt"),"GBK")){
            int charInt = 0 ;
            while((charInt = isr.read())!=-1){
                System.out.println((char)charInt);
            }
        }catch (Exception e){
            throw new RuntimeException(e);
        }
    }
}
一个构造方法的使用而已,对于OutputStreamReader也是一样的操作。不演示了。
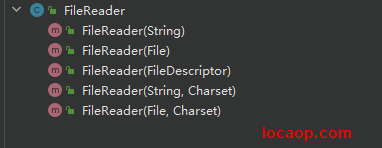
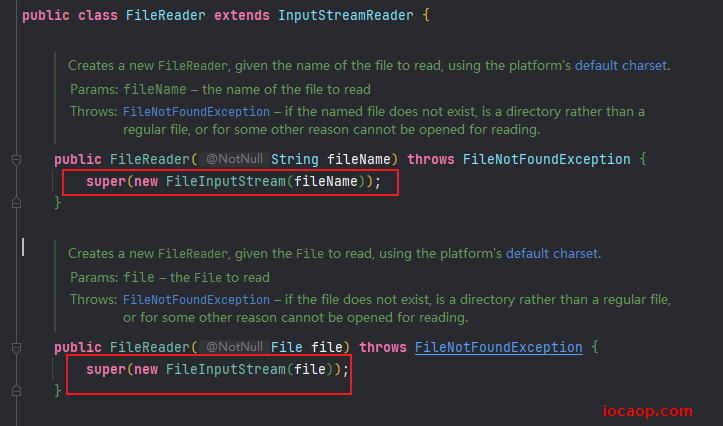
学习到这,知道了在JDK11之前,转换流可以用来做指定编码的读写,那JDK11以后呢?FileReader新推出了一个构造:
public class FileReaderDemo03 {
    public static void main(String[] args){
        try(FileReader fr = new FileReader("D:\\dev\\workfile\\该文件夹的作用.txt", Charset.forName("GBK"))){
            int charInt = 0;
            while((charInt = fr.read())!=-1){
                System.out.println((char)charInt);
            }
        }catch (Exception e){

        }
    }
}
所以jdk11之后就没必要再用转换流进行读写了。
18-对象操作流-基本特点
需求:将用户对象写入文件。
/**
 * 用户
 *
 * @author lzc
 * @date 2023/06/15
 */
@Data
@AllArgsConstructor
@NoArgsConstructor
public class User {

    /**
     * 用户名
     */
    private String username;

    /**
     * 密码
     */
    private String password;
}
在学习对象操作流之前,我们会这样写:
/**
* 将对象写到文件
*
* @author lzc
* @date 2023/06/15
*/
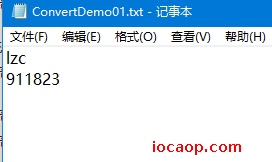
public class ConvertDemo01 {
public static void main(String[] args) {
User lzc = new User("lzc", "911823");
try(BufferedWriter bw = new BufferedWriter(new FileWriter("D:\\dev\\workfile\\ConvertDemo01.txt"));) {
bw.write(lzc.getUsername());
bw.newLine();
bw.write(lzc.getPassword());
}catch (Exception e){
throw new RuntimeException("错误");
}
}
}
运行结果:
写是写好了,会不会有问题?
- 写入时,需要关心对象的属性,一个个写
- 写入后,文件太容易被读懂。
所以需要使用对象操作流:
可以把对象以字节的形式写到本地文件,直接打开是看不懂的,需要再次使用对象操作流把字节读到内存中,转为对象。
19-对象操作流-序列化
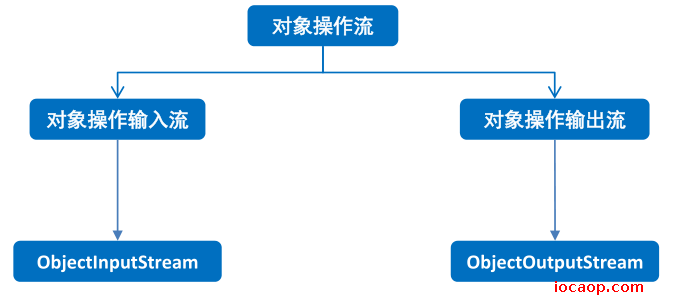
对象操作流分两类:对象操作输入流和对象操作输出流。
对象操作输入流(反序列化流):将本地文件中的对象读到内存中,或接收网络中传输的对象。
对象操作输出流(序列化流):将对象写到本地文件或在网络中传输对象。
试着使用对象操作输出流将对象写入文件:
/**
 * 对象操作流-将对象写到本地文件中
 *
 * @author lzc
 * @date 2023/06/15
 */
public class ConvertDemo02 {

    public static void main(String[] args) {
        User lzc = new User("lzc", "911823616");
        try (ObjectOutputStream oos =  new ObjectOutputStream(new FileOutputStream("D:\\dev\\workfile\\ConvertDemo02.txt"));){
            oos.writeObject(lzc);
        }catch (Exception e){
            e.printStackTrace();
            throw new RuntimeException("错误");
        }
    }
}
运行报错了:
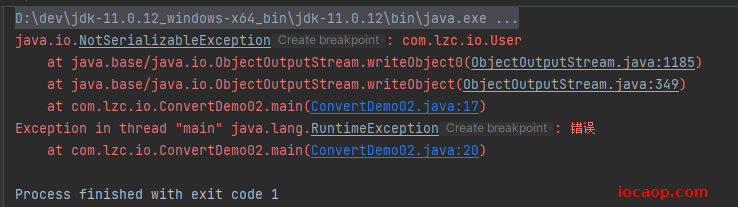
可以复制这个异常到API中找:
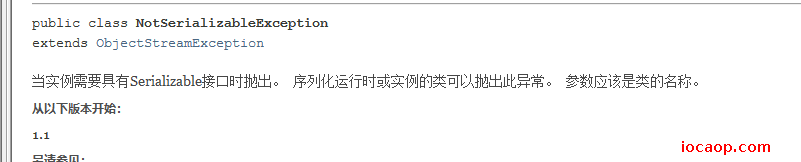
简单的说:就是如果想要User类想要能够被对象操作输出流序列化,User类就必须要实现Serializable接口,实现后,我们再次运行:

再来看Serializable接口,我们实现了这个类,却没有重写任何方法,为什么没有报错?看接口源码:
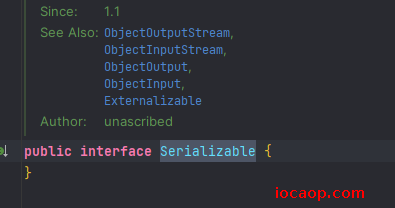
什么也没有,这是一个标记性接口,只要实现了这个接口,那么就表示这个类的对象可以被序列化。
20-对象操作流-反序列化
和序列化类似:
/**
* 对象操作流-反序列化,将对象从本地文件中读取
*
* @author lzc
* @date 2023/06/15
*/
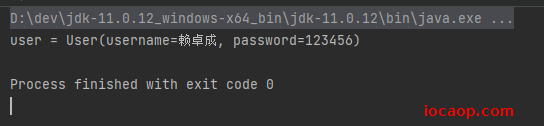
public class ConvertDemo03 {
public static void main(String[] args) {
try(ObjectInputStream ois = new ObjectInputStream(new FileInputStream("D:\\dev\\workfile\\ConvertDemo02.txt"))) {
Object o = ois.readObject();
if (o instanceof User){
User user = (User)o;
System.out.println("user = " + user);
}
}catch (Exception e){
e.printStackTrace();
throw new RuntimeException("错误");
}
}
}

21~22-对象操作流-注意点
注意点1:序列化后修改类怎么办
如果一个类的对象被写到文件后,我们又修改了这个类(JavaBean),再次从本地文件读取,会发生什么?
我们先将序列化和反序列化的代码写好,并测试好:
/**
 * 将对象写到文件后修改JavaBean再读取会发生什么
 *
 * @author lzc
 * @date 2023/06/15
 */
public class ConvertDemo04 {
    private static final String FILE_PATH = "D:\\dev\\workfile\\ConvertDemo04.txt";

    public static void main(String[] args) {
        serialization();

        deserialization();
    }

    /**
     * 反序列化对象
     */
    private static void deserialization() {
        try (ObjectInputStream ois = new ObjectInputStream(new FileInputStream(FILE_PATH))){
            Object o = ois.readObject();
            if (o instanceof User){
                User user = (User) o;
                System.out.println("user = " + user);
            }
        }catch (Exception e){
            e.printStackTrace();
            throw new RuntimeException("错误");
        }
    }

    /**
     * 序列化对象
     */
    private static void serialization() {
        try (ObjectOutputStream oos = new ObjectOutputStream(new FileOutputStream(FILE_PATH))) {
            User user = new User("赖卓成", "123456");
            oos.writeObject(user);
        } catch (Exception e) {
            e.printStackTrace();
            throw new RuntimeException("错误");
        }
    }
}
/**
 * 用户
 *
 * @author lzc
 * @date 2023/06/15
 */
@Data
@AllArgsConstructor
@NoArgsConstructor
public class User implements Serializable {

    /**
     * 用户名
     */
    private String username;

    /**
     * 密码
     */
    private String password;
}
测试没问题:

这时,我们修改一下User类中的属性username的修饰符,将private修改为public ,注释掉序列化方法,直接从内存读取修改之前序列化到文件中的对象:

报错了,复制InvalidClassException到API中查找:
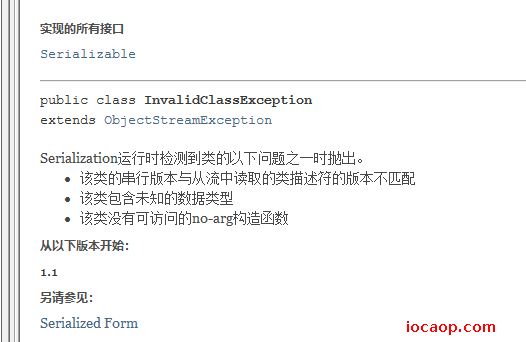
看异常信息:
java.io.InvalidClassException: com.lzc.io.User; local class incompatible: stream classdesc serialVersionUID = -2338702451887482064, local class serialVersionUID = -826703526409179226
说的是,流中的serialVersionUID和当前类中的serialVersionUID不一样。但是我们根本没有定义这个serialVersionUID,怎么回事?
serialVersionUID是序列号,如果我们没有显示定义,那么虚拟机会根据类中的成员,包括成员变量和成员方法,自动计算出一个序列号。
自动计算的序列号会有一个问题:如果我们修改了类中的信息,那么虚拟机会再次自动计算出一个序列号。
那么我先遇到我异常就迎刃而解了:因为第一次我们将对象写到文件,虚拟机根据类自动计算出了一个序列号并且写到了文件,然后我们又修改了类中的username的修饰符,虚拟机又会自动计算出一个序列号,导致修改以后再次读取(反序列化)时的类的序列号和写到文件中对象的类的序列号不一致。
如何解决?简单,不让虚拟机帮我们自动计算,我们显示地定义这个序列号,而且这个序列号不变,就行了。
怎么定义?
/**
 * 用户
 *
 * @author lzc
 * @date 2023/06/15
 */
@Data
@AllArgsConstructor
@NoArgsConstructor
public class User implements Serializable {

    public static final long serialVersionUID = 1L;

    /**
     * 用户名
     */
    public String username;

    /**
     * 密码
     */
    private String password;
}
显示定义序列号以后,再试一次,先将对象写到本地文件,再修改javaBean,再读取修改之前写好的本地文件,看看会不会报错。
结果:不会报错

注意点2:类中某个成员不想被序列化怎么办
加修饰符:
transient
该修饰符修饰的变量,不参与序列化。
/**
 * 用户
 *
 * @author lzc
 * @date 2023/06/15
 */
@Data
@AllArgsConstructor
@NoArgsConstructor
public class User implements Serializable {

    public static final long serialVersionUID = 1L;

    /**
     * 用户名
     */
    private String username;

    /**
     * 密码
     */
    private transient String password;
}
运行:

23-对象操作流练习-写入、读取多个对象
写入多个对象到本地文件
    /**
     * 序列化
     */
    private static void serialization() {
        User lzc1 = new User("lzc", "123456");
        User lzc2 = new User("laizhuocheng", "654321");
        User lzc3 = new User("赖卓成", "0.0.0.0.0");

        try(ObjectOutputStream oos = new ObjectOutputStream(new FileOutputStream(FILE_PATH))){
        oos.writeObject(lzc1);
        oos.writeObject(lzc2);
        oos.writeObject(lzc3);
        }catch (Exception e){
            e.printStackTrace();
            throw new RuntimeException("错误");
        }
    }
}
关键是怎么读?我们在使用字节流读文件时是定义个变量来读,-1表示读完了,这里怎么办?先用null试试
    /**
     * 反序列化
     */
    private static void deserialization() {
        try (ObjectInputStream ois = new ObjectInputStream(new FileInputStream(FILE_PATH))){
            Object o;
            while((o = ois.readObject())!=null){
                User user = (User) o;
                System.out.println("user = " + user);
            }
        }catch (Exception e){
            e.printStackTrace();
            throw new RuntimeException("错误");
        }
    }
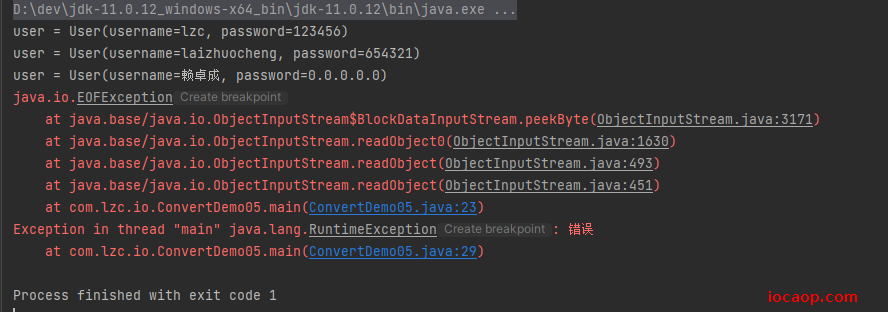
读是能读,但最后报错了,我们复制异常到API中查看:
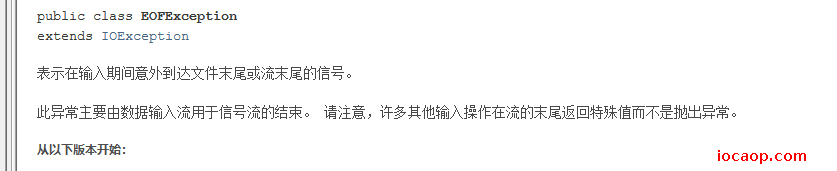
既然如此,我们是不是可以通过这个异常来判断是否读到文件末尾了?修改代码:
    /**
     * 反序列化
     */
    private static void deserialization() {
        try (ObjectInputStream ois = new ObjectInputStream(new FileInputStream(FILE_PATH))){
            while (true){
                try {
                    Object o = ois.readObject();
                    User user = (User) o;
                    System.out.println("user = " + user);
                } catch (EOFException e) {
                    break;
                }
            }
        }catch (Exception e){
            e.printStackTrace();
            throw new RuntimeException("错误");
        }
    }
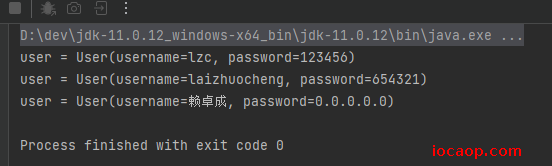
运行没问题:
除了这个方法,还有没有其他办法?可以使用容器,如
ArrayList,将多个对象放入容器中进行读取和写入,就不用判断是否到达文件末尾,直接一次性读取整个容器。
24-Properties-概述
其实Properties不是io体系中的,而是集合体系中的一员。
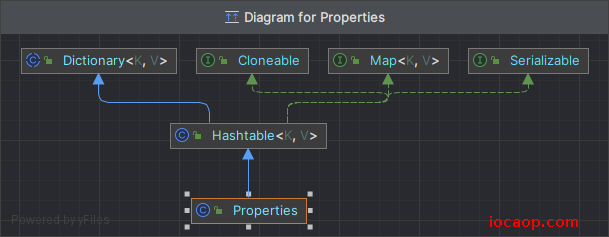
可以看到,Properties继承了HashTable,间接继承了Map,所以Properties是一个双列集合,从图中也可以看出,Properties没有泛型,写了会报错,不过它可以存放任意类型的kv,一般使用String类型。
为什么不在集合部分学习?因为它跟io相关。

25-Properties-作为Map集合的基本使用
我们知道Properties实现了Map集合,那么面向接口编程,我们就可以使用Map接口中定义好的成员方法。
不解释了,直接看代码:
/**
* Properties作为Map的基本使用
*
* @author lzc
* @date 2023/06/15
*/
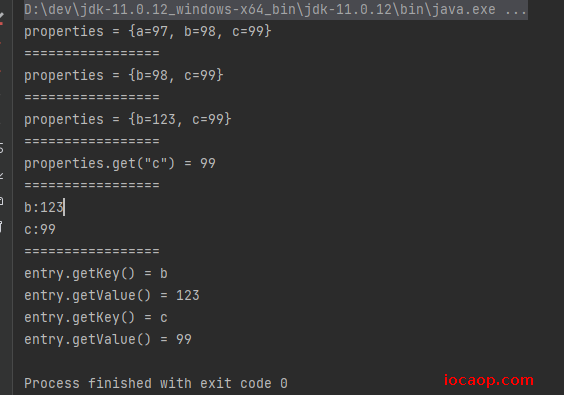
public class PropertiesDemo01 {
public static void main(String[] args) {
Properties properties = new Properties();
// 增
properties.put("a",97);
properties.put("b",98);
properties.put("c",99);
System.out.println("properties = " + properties);
System.out.println("=================");
// 删
properties.remove("a");
System.out.println("properties = " + properties);
System.out.println("=================");
// 改
properties.put("b",123);
System.out.println("properties = " + properties);
System.out.println("=================");
// 查
System.out.println("properties.get(\"c\") = " + properties.get("c"));
System.out.println("=================");
// 遍历
Set<Object> keySet = properties.keySet();
for (Object o : keySet) {
Object v = properties.get(o);
System.out.println(o+":"+v);
}
System.out.println("=================");
Set<Map.Entry<Object, Object>> entries = properties.entrySet();
for (Map.Entry<Object, Object> entry : entries) {
System.out.println("entry.getKey() = " + entry.getKey());
System.out.println("entry.getValue() = " + entry.getValue());
}
}
}
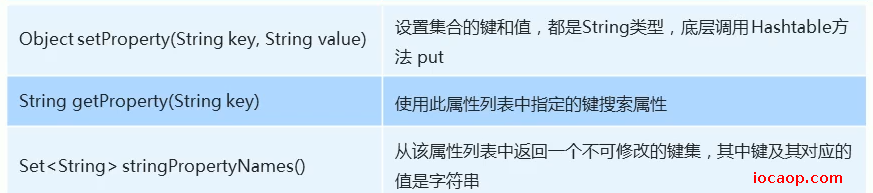
26-Properties-特有方法(相较于Map)
/**
* Properties特有方法
*
* @author lzc
* @date 2023/06/16
*/
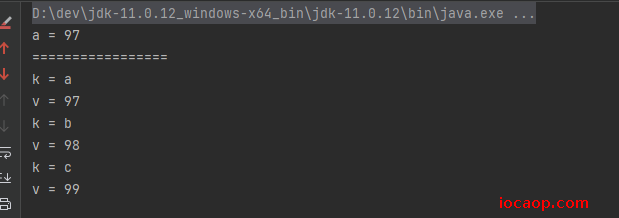
public class PropertiesDemo02 {
public static void main(String[] args) {
Properties properties = new Properties();
// 设置键值
properties.setProperty("a","97");
properties.setProperty("b","98");
properties.setProperty("c","99");
// 获取值
String a = properties.getProperty("a");
System.out.println("a = " + a);
System.out.println("=================");
// 遍历 返回一个不可变的键的集合
Set<String> keySet = properties.stringPropertyNames();
for (String k : keySet) {
String v = properties.getProperty(k);
System.out.println("k = " + k);
System.out.println("v = " + v);
}
}
}
27-Properties-load
Properties于IO结合的方法:
load方法可以直接从.properties格式的文件中读取键值对到内存中(Properties对象),文件中的内容是键值格式
例如:
username = lzc
password = 666
/**
 * Properties的load
 *
 * @author lzc
 * @date 2023/06/16
 */
public class PropertiesDemo03 {
    public static void main(String[] args) throws FileNotFoundException {
        Properties properties = new Properties();
        try (BufferedReader br = new BufferedReader(new FileReader("D:\\dev\\workfile\\PropertiesDemo03.properties"))){
            properties.load(br);
            System.out.println("properties = " + properties);
        }catch (Exception e){
            e.printStackTrace();
            throw new RuntimeException("错误");
        }
    }
}
运行结果:

运行结果顺序和文件中不一样,因为
Properties属于Map、HashTable
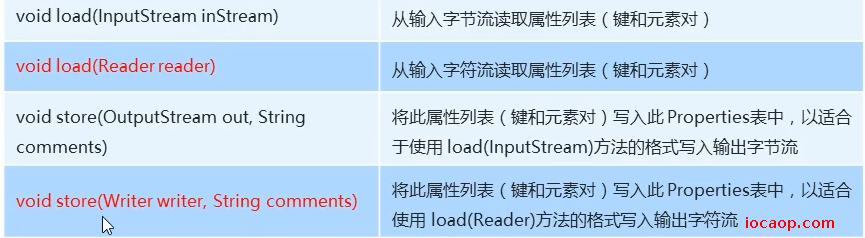
28-Properties-store
/**
* Properties的store方法导出配置
*
* @author lzc
* @date 2023/06/16
*/
public class PropertiesDemo04 {
public static void main(String[] args) {
Properties properties = new Properties();
properties.put("k1","v1");
properties.put("k2","v2");
properties.put("k3","v3");
properties.put("k4","v4");
try (BufferedWriter bw = new BufferedWriter(new FileWriter("D:\\dev\\workfile\\PropertiesDemo04.properties"))){
// 参数2为注释
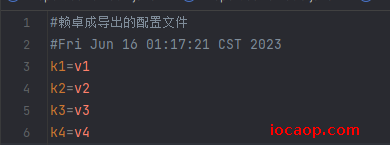
properties.store(bw,"赖卓成导出的配置文件");
} catch (IOException e) {
e.printStackTrace();
throw new RuntimeException("错误");
}
}
}
第一次导出,注释有问题,因为没有设置好编码格式:
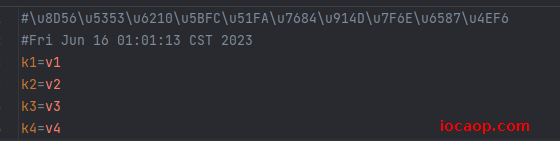

设置后为UTF-8后仍然乱码。
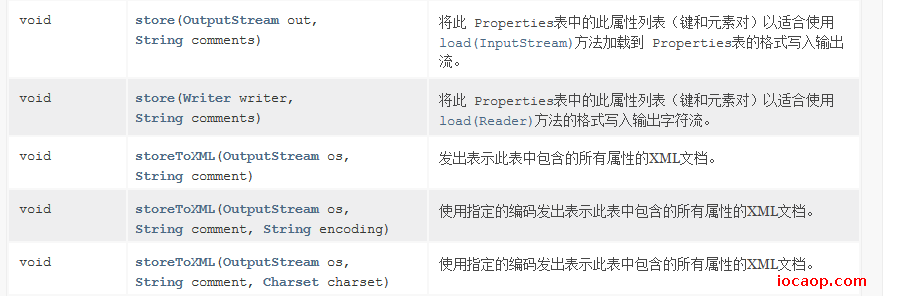
尝试过使用转换流,依然无效:这个问题先不纠结了。实在不行就使用 storeToXML(OutputStream os, String comment, Charset charset),写到xml
/**
 * 转换流 解决读取、写入中文乱码的问题  TODO 未解决
 *
 * @author lzc
 * @date 2023/06/16
 */
public class PropertiesDemo05 {
    public static void main(String[] args) {
        Properties properties = new Properties();
        properties.put("k1","v1");
        properties.put("k2","v2");
        properties.put("k3","v3");
        properties.put("k4","v4");

        try (OutputStreamWriter osw = new OutputStreamWriter(new FileOutputStream("D:\\dev\\workfile\\PropertiesDemo05.properties"), StandardCharsets.UTF_8)){
            // 参数2为注释
            properties.store(osw,"赖卓成导出的配置文件");
            osw.flush(); // 刷新缓冲区,确保所有数据都被写入文件
        } catch (IOException e) {
            e.printStackTrace();
            throw new RuntimeException("错误");
        }

    }
}
或者在idea中设置:
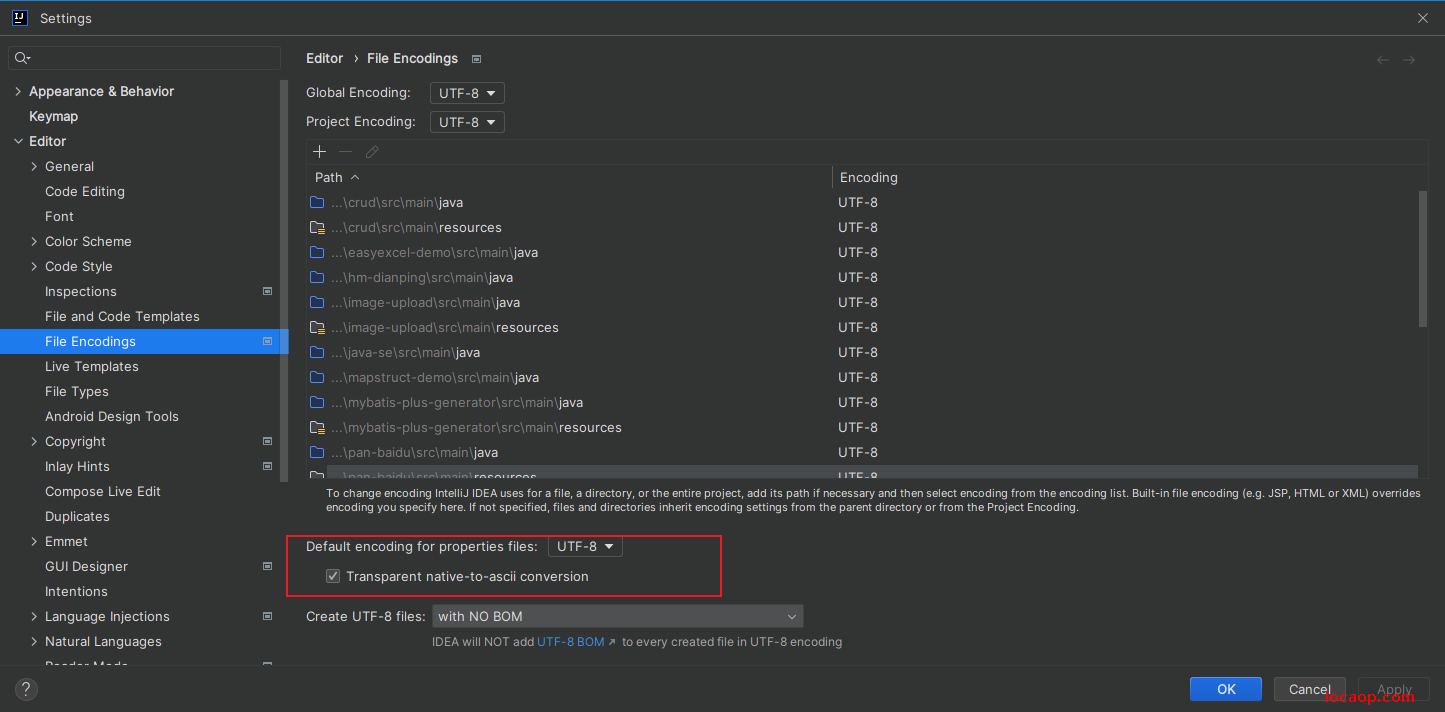
即可正常显示: